harmony 鸿蒙Touchscreen Event
Touchscreen Event
Touchscreen events are events triggered when a finger or stylus is placed on, moved along, or lifted from a component. They can be classified as click event, drag event, or touch event.
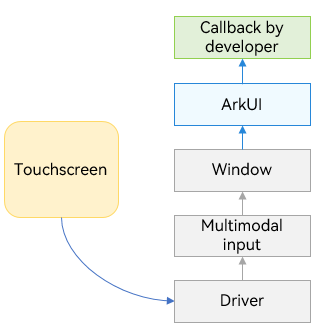
Figure 1 Touchscreen event principles

Click Event
A click event is triggered when a complete press and lift action is performed by using a finger or a stylus. When a click event occurs, the following callback is triggered:
onClick(event: (event?: ClickEvent) => void)
The event parameter provides the coordinates of the click relative to the window or component as well as the event source where the click occurs, for example, a button, a click on which shows or hides an image.
@Entry
@Component
struct IfElseTransition {
  @State flag: boolean = true;
  @State btnMsg: string = 'show';

  build() {
    Column() {
      Button(this.btnMsg).width(80).height(30).margin(30)
        .onClick(() => {
          if (this.flag) {
            this.btnMsg = 'hide';
          } else {
            this.btnMsg = 'show';
          }
          // Click the button to show or hide the image.
          this.flag = !this.flag;
        })
      if (this.flag) {
        Image($r('app.media.icon')).width(200).height(200)
      }
    }.height('100%').width('100%')
  }
}
Drag Event
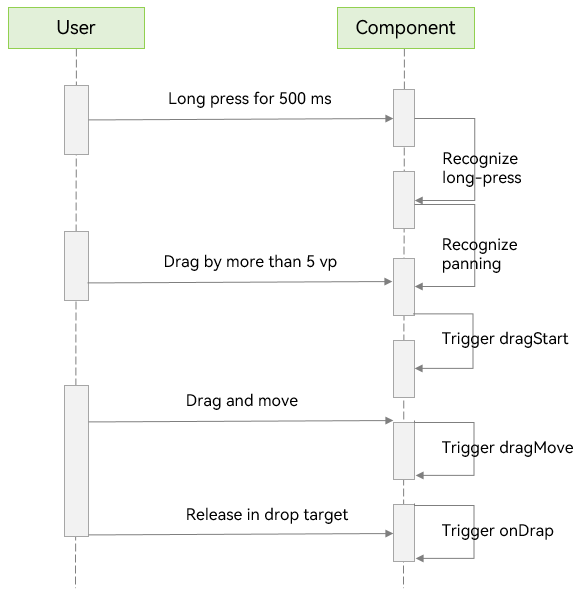
A drag event is triggered when a user long presses a component (>= 500 ms) using a finger or stylus and drags the component to the drop target.
Whether a drag event can be triggered depends on the distance of finger or stylus movement on the screen. The drag event is triggered when this distance reaches 5 vp. ArkUI supports intra-application and cross-application drag events.
The following figure illustrates the process of triggering a drag event.

The drag event provides the following APIs.
| API | Description |
|---|---|
| onDragStart(event: (event?: DragEvent, extraParams?: string) => CustomBuilder |DragItemInfo) | Triggered when dragging starts. Currently, only custom pixelmap objects and custom components are supported. |
| onDragEnter(event: (event?: DragEvent, extraParams?: string) => void) | Triggered when the dragged item enters a valid drop target. DragEvent: position where the drag occurs. extraParmas: custom information about the drag event. |
| onDragLeave(event: (event?: DragEvent, extraParams?: string) => void) | Triggered when the dragged item leaves a valid drop target. DragEvent: position where the drag occurs. extraParmas: custom information about the drag event. |
| onDragMove(event: (event?: DragEvent, extraParams?: string) => void) | Triggered when the dragged item moves in a valid drop target. DragEvent: position where the drag occurs. extraParmas: custom information about the drag event. |
| onDrop(event: (event?: DragEvent, extraParams?: string) => void) | Triggered when the dragged item is dropped on a valid drop target. DragEvent: position where the drag occurs. extraParmas: custom information about the drag event. |
The following is an example of dragging a component out of a window in cross-window dragging:
import image from '@ohos.multimedia.image';

@Entry
@Component
struct Index {
  @State visible: Visibility = Visibility.Visible
  private pixelMapReader:image.PixelMap|undefined = undefined

  aboutToAppear() {
    console.info('begin to create pixmap has info message: ')
    this.createPixelMap()
  }

  createPixelMap() {
    let color = new ArrayBuffer(4 * 96 * 96);
    let buffer = new Uint8Array(color);
    for (let i = 0; i < buffer.length; i++) {
      buffer[i] = (i + 1) % 255;
    }
    class hw{
      height:number = 96
      width:number = 96
    }
    let hwo:hw = new hw()
    let ops:image.InitializationOptions|void = {
      'alphaType': 0,
      'editable': true,
      'pixelFormat': 4,
      'scaleMode': 1,
      'size': hwo
    }
    const promise: Promise<image.PixelMap> = image.createPixelMap(color, ops);
    promise.then((data:image.PixelMap|undefined) => {
      console.info('create pixmap has info message: ' + JSON.stringify(data))
      if(data){
        this.pixelMapReader = data;
      }
    })
  }

  @Builder pixelMapBuilder() {
    Text('drag item')
      .width('100%')
      .height(100)
      .fontSize(16)
      .textAlign(TextAlign.Center)
      .borderRadius(10)
      .backgroundColor(0xFFFFFF)
  }

  build() {
    Flex({ direction: FlexDirection.Column, alignItems: ItemAlign.Center, justifyContent: FlexAlign.Center }) {
      Text('App1')
        .width('40%')
        .height(80)
        .fontSize(20)
        .margin(30)
        .textAlign(TextAlign.Center)
        .backgroundColor(Color.Pink)
        .visibility(Visibility.Visible)

      Text('Across Window Drag This')
        .width('80%')
        .height(80)
        .fontSize(16)
        .margin(30)
        .textAlign(TextAlign.Center)
        .backgroundColor(Color.Pink)
        .visibility(this.visible)
        .onDragStart((event: DragEvent|undefined, extraParams: string|undefined):CustomBuilder|DragItemInfo => {
          console.info('Text onDrag start')
          return { pixelMap: this.pixelMapReader, extraInfo: 'custom extra info.' }
        })
        .onDrop((event: DragEvent|undefined, extraParams: string|undefined) => {
          console.info('Text onDragDrop,  ')
          this.visible = Visibility.None                    // Make the source invisible after the dragging is complete.
        })
    }

    .width('100%')
    .height('100%')
  }
}
The following is an example of dragging a component into a window in cross-window dragging:
@Entry
@Component
struct Index {
  @State number: string[] = ['drag here']
  @State text: string = ''
  @State bool1: boolean = false
  @State bool2: boolean = false
  @State visible: Visibility = Visibility.Visible
  @State visible2: Visibility = Visibility.None
  scroller: Scroller = new Scroller()

  build() {
    Flex({ direction: FlexDirection.Column, alignItems: ItemAlign.Center, justifyContent: FlexAlign.Center }) {
      Text('App2')
        .width('40%')
        .height(80)
        .fontSize(20)
        .margin(30)
        .textAlign(TextAlign.Center)
        .backgroundColor(Color.Pink)
        .visibility(Visibility.Visible)

      List({ space: 20, initialIndex: 0 }) {
        ForEach(this.number, (item:string) => {
          ListItem() {
            Text('' + item)
              .width('100%')
              .height(80)
              .fontSize(16)
              .borderRadius(10)
              .textAlign(TextAlign.Center)
              .backgroundColor(0xFFFFFF)
          }
        }, (item:string):string => item)

        ListItem() {
          Text('Across Window Drag This')
            .width('80%')
            .height(80)
            .fontSize(16)
            .margin(30)
            .textAlign(TextAlign.Center)
            .backgroundColor(Color.Pink)
            .visibility(this.visible2)
        }
      }
      .height('50%')
      .width('90%')
      .border({ width: 1 })
      .divider({ strokeWidth: 2, color: 0xFFFFFF, startMargin: 20, endMargin: 20 })
      .onDragEnter((event: DragEvent|undefined, extraParams: string|undefined) => {                         // Triggered when the dragged item enters a valid drop target.
        console.info('List onDragEnter, ' + extraParams)
      })
      .onDragMove((event: DragEvent|undefined, extraParams: string|undefined) => {                          // Triggered when the dragged item moves in a valid drop target.
        console.info('List onDragMove, ' + extraParams)
      })
      .onDragLeave((event: DragEvent|undefined, extraParams: string|undefined) => {                         // Triggered when the dragged item leaves a valid drop target.
        console.info('List onDragLeave, ' + extraParams)
      })
      .onDrop((event: DragEvent|undefined, extraParams: string|undefined) => {                              // Triggered when the dragged item is dropped on a valid drop target.
        console.info('List onDragDrop, ' + extraParams)
        this.visible2 = Visibility.Visible                                              // Make the dragged object visible.
      })
    }
    .width('100%')
    .height('100%')
  }
}
Touch Event
A touch event is triggered when a finger or stylus is placed on, moved along, or lifted from a component.
onTouch(event: (event?: TouchEvent) => void)
If event.type is TouchType.Down, the finger or stylus is placed on the component.
If event.type is TouchType.Up, the finger or stylus is lifted from the component.
If event.type is TouchType.Move, the finger or stylus is moved along the component.
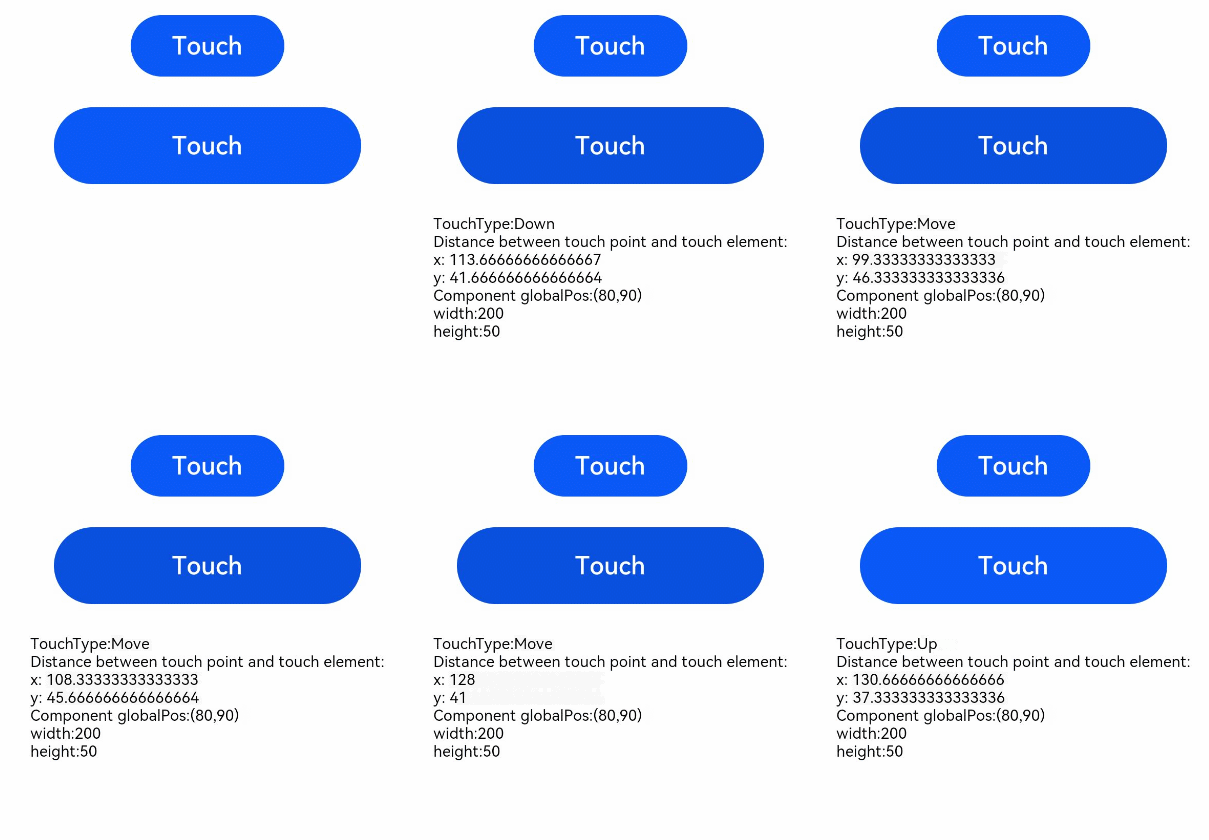
The touch event supports single and multi-touch interactions. Information about the touch event can be obtained using the event parameter, such as the location of the finger that triggers the event, unique identifier of the finger, finger information changed, and the input device source.
// xxx.ets
@Entry
@Component
struct TouchExample {
  @State text: string = '';
  @State eventType: string = '';

  build() {
    Column() {
      Button('Touch').height(40).width(100)
        .onTouch((event?: TouchEvent) => {
          if(event){
            if (event.type === TouchType.Down) {
              this.eventType = 'Down';
            }
            if (event.type === TouchType.Up) {
              this.eventType = 'Up';
            }
            if (event.type === TouchType.Move) {
              this.eventType = 'Move';
            }
            this.text = 'TouchType:' + this.eventType + '\nDistance between touch point and touch element:\nx: '
            + event.touches[0].x + '\n' + 'y: ' + event.touches[0].y + '\nComponent globalPos:('
            + event.target.area.globalPosition.x + ',' + event.target.area.globalPosition.y + ')\nwidth:'
            + event.target.area.width + '\nheight:' + event.target.area.height
          }
        })
      Button('Touch').height(50).width(200).margin(20)
        .onTouch((event?: TouchEvent) => {
          if(event){
            if (event.type === TouchType.Down) {
              this.eventType = 'Down';
            }
            if (event.type === TouchType.Up) {
              this.eventType = 'Up';
            }
            if (event.type === TouchType.Move) {
              this.eventType = 'Move';
            }
            this.text = 'TouchType:' + this.eventType + '\nDistance between touch point and touch element:\nx: '
            + event.touches[0].x + '\n' + 'y: ' + event.touches[0].y + '\nComponent globalPos:('
            + event.target.area.globalPosition.x + ',' + event.target.area.globalPosition.y + ')\nwidth:'
            + event.target.area.width + '\nheight:' + event.target.area.height
          }
        })
      Text(this.text)
    }.width('100%').padding(30)
  }
}

你可能感兴趣的鸿蒙文章
harmony 鸿蒙Property Animation APIs
harmony 鸿蒙Property Animation Overview
- 所属分类: 后端技术
- 本文标签:
热门推荐
-
2、 - 优质文章
-
3、 gate.io
-
8、 golang
-
9、 openharmony
-
10、 Vue中input框自动聚焦