harmony 鸿蒙Development of Layout Container Components
Development of Layout Container Components
Layout container components consist of basic view classes. You can set the view positions to achieve nested and overlapped layouts, set the layout type and margin to standardize the child components in the layout, and call certain functions to implement layout views based on parent and sibling components.
UISwipeView
When to Use
UISwipeView inherits from UIViewGroup. In addition to the Add, Remove, and Insert functions, UISwipeView provides the functions to swipe contents by page and center the current page after swiping. This component can be horizontally or vertically centered. Child components added via the Add function are automatically horizontally or vertically centered, adaptive to the UISwipeView direction, in the sequence they were added.
Available APIs
Table 1 Available functions in SwipeView
Development Procedure (Non-Cyclic Horizontal Swiping)
Create a horizontal swiping UISwipeView.
UISwipeView* swipe = new UISwipeView(UISwipeView::HORIZONTAL);Add child components to UISwipeView.
UILabelButton* button1 = new UILabelButton();
button1->SetPosition(0, 0, g_ButtonW, g_ButtonH);
button1->SetText("button1");
swipe->Add(button1);
UILabelButton* button2 = new UILabelButton();
button2->SetPosition(0, 0, g_ButtonW, g_ButtonH);
button2->SetText("button2");
swipe->Add(button2);
UILabelButton* button3 = new UILabelButton();
button3->SetPosition(0, 0, g_ButtonW, g_ButtonH);
button3->SetText("button3");
swipe->Add(button3);
Verify that the components are swiping horizontally but not cyclically.
Figure 1 Horizontal swiping effect of UISwipeView

Development Procedure (Cyclic Horizontal Swiping)
Create a horizontal swiping UISwipeView and add its child components.
UISwipeView* swipe = new UISwipeView(UISwipeView::HORIZONTAL);
UILabelButton* button1 = new UILabelButton();
button1->SetPosition(0, 0, g_ButtonW, g_ButtonH);
button1->SetText("button1");
swipe->Add(button1);
UILabelButton* button2 = new UILabelButton();
button2->SetPosition(0, 0, g_ButtonW, g_ButtonH);
button2->SetText("button2");
swipe->Add(button2);
UILabelButton* button3 = new UILabelButton();
button3->SetPosition(0, 0, g_ButtonW, g_ButtonH);
button3->SetText("button3");
swipe->Add(button3);
Enable cyclic swiping for the UISwipeView.
swipe->SetLoopState(true);Verify that the components are swiping horizontally and cyclically.
Figure 2 Cyclic horizontal swiping effect of UISwipeView

GridLayout
When to Use
GridLayout provides the basic layout capability to set the number of grid rows and columns. Child components added via the Add function are automatically arranged after the LayoutChildren() function is called.
Available APIs
Table 2 Available functions in GridLayout
How to Develop
Create a GridLayout instance and set its position and size.
GridLayout* layout_ = new GridLayout();
layout_->SetPosition(0, g_y, HROIZONTAL_RESOLUTION, 200);
layout_->SetLayoutDirection(LAYOUT_HOR);
layout_->SetRows(2);
layout_->SetCols(2);
Create UILabelButton instances.
UILabelButton* bt1 = new UILabelButton();
bt1->SetPosition(0,0,100,50);
bt1->SetText("bt1");
UILabelButton* bt2 = new UILabelButton();
bt2->SetPosition(0, 0, 100, 50);
bt2->SetText("bt2");
UILabelButton* bt3 = new UILabelButton();
bt3->SetPosition(0, 0, 100, 50);
bt3->SetText("bt3");
UILabelButton* bt4 = new UILabelButton();
bt4->SetPosition(0, 0, 100, 50);
bt4->SetText("bt4");
Add child components and call the LayoutChildren() function.
layout_->Add(bt1);
layout_->Add(bt2);
layout_->Add(bt3);
layout_->Add(bt4);
layout_->LayoutChildren();
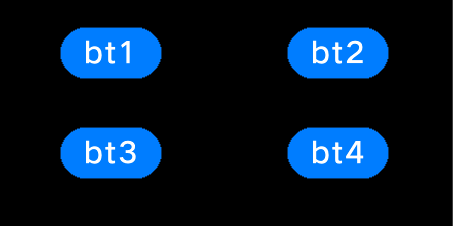
Verify the layout of buttons, as shown in the following figure.
Figure 3 Setting a 2x2 grid and adding four buttons in a layout

你可能感兴趣的鸿蒙文章
harmony 鸿蒙AI Framework Development Guide
harmony 鸿蒙NNRt Access Adaptation
harmony 鸿蒙Application Privilege Configuration
harmony 鸿蒙Setting Up a Development Environment
harmony 鸿蒙Development Guidelines
harmony 鸿蒙Application Framework Overview
- 所属分类: 后端技术
- 本文标签:
热门推荐
-
2、 - 优质文章
-
3、 gate.io
-
8、 golang
-
9、 openharmony
-
10、 Vue中input框自动聚焦