使用HTTP全局拦截器 (C/C++)
场景介绍
从API version 24开始,通过HTTP全局拦截器,开发者可以监控HTTP流量,实现日志记录功能。
接口说明
HTTP全局拦截器常用接口如下表所示,详细的接口说明请参考http_interceptor.h。
| 接口名 | 描述 |
|---|---|
| OH_Http_AddReadOnlyInterceptor(struct OH_Http_Interceptor *interceptor) | 添加一个HTTP全局只读拦截器。 |
| OH_Http_RemoveInterceptor(struct OH_Http_Interceptor *interceptor) | 删除指定的HTTP全局拦截器。 |
| OH_Http_RemoveAllInterceptors(int32_t groupId) | 删除指定组ID的所有HTTP全局拦截器。 |
| OH_Http_StartAllInterceptors(int32_t groupId) | 启用指定组ID的所有HTTP全局拦截器。 |
| OH_Http_StopAllInterceptors(int32_t groupId) | 停用指定组ID的所有HTTP全局拦截器。 |
开发步骤
使用本文档涉及接口创建并使用HTTP全局拦截器时,需先创建Native C++工程,在源文件中封装相关接口,然后在ArkTS层调用封装好的接口,使用hilog或console.info等方法将日志打印到控制台或生成设备日志。
本文以添加HTTP全局只读响应拦截器、启用/停用拦截器、删除拦截器为例,提供具体的开发指导。
添加开发依赖
添加动态链接库
CMakeLists.txt中添加以下lib:
libace_napi.z.so
libhttp_interceptor.so
头文件
#include "napi/native_api.h"
#include "network/netstack/http_interceptor.h"
#include "network/netstack/http_interceptor_type.h"
构建工程
-
在源文件中编写调用该API的代码,实现HTTP全局拦截器的处理函数和相关操作。
#include "napi/native_api.h"
#include "network/netstack/http_interceptor.h"
#include "network/netstack/http_interceptor_type.h"
#include "hilog/log.h"

#include <cstring>

#undef LOG_DOMAIN
#undef LOG_TAG
#define LOG_DOMAIN 0x3200 // 全局domain宏,标识业务领域
#define LOG_TAG "HttpInterceptorDemo"  // 全局tag宏,标识模块日志tag

// 全局拦截器实例
static OH_Http_Interceptor g_responseInterceptor = {
    .groupId = 1,
    .stage = OH_STAGE_RESPONSE,
    .type = OH_TYPE_READ_ONLY,
    .enabled = 1,
    .handler = nullptr,
};

// 日志打印辅助函数
void LogHeader(OH_Http_Interceptor_Headers *headers)
{
    OH_LOG_INFO(LOG_APP, "---------------------header begin---------------------");
    while (headers != nullptr) {
        if (headers->data != nullptr) {
            OH_LOG_INFO(LOG_APP, "%{public}s", headers->data);
        }
        headers = headers->next;
    }
    OH_LOG_INFO(LOG_APP, "---------------------header end---------------------");
}

// 打印响应信息
void PrintResponseInfo(OH_Http_Interceptor_Response *response)
{
    OH_LOG_INFO(LOG_APP, "-----PrintResponseInfo Begin-----");
    if (response != nullptr) {
        OH_LOG_INFO(LOG_APP, "responseCode = %{public}d", response->responseCode);
        if (response->body.buffer != nullptr) {
            OH_LOG_INFO(LOG_APP, "body = %{public}s", response->body.buffer);
        }
        if (response->headers != nullptr) {
            LogHeader(response->headers);
        }

        OH_LOG_INFO(LOG_APP, "dns: %{public}lf", response->performanceTiming.dnsTiming);
        OH_LOG_INFO(LOG_APP, "tcp: %{public}lf", response->performanceTiming.tcpTiming);
        OH_LOG_INFO(LOG_APP, "tls: %{public}lf", response->performanceTiming.tlsTiming);
        OH_LOG_INFO(LOG_APP, "snd: %{public}lf", response->performanceTiming.firstSendTiming);
        OH_LOG_INFO(LOG_APP, "rcv: %{public}lf", response->performanceTiming.firstReceiveTiming);
        OH_LOG_INFO(LOG_APP, "tot: %{public}lf", response->performanceTiming.totalFinishTiming);
        OH_LOG_INFO(LOG_APP, "rdr: %{public}lf", response->performanceTiming.redirectTiming);
        OH_LOG_INFO(LOG_APP, "-----PrintResponseInfo End-----");
    }
}

// 响应拦截器处理函数
OH_Interceptor_Result ResponseInterceptorHandler(
    OH_Http_Interceptor_Request *request,
    OH_Http_Interceptor_Response *response,
    int32_t *isModified)
{
    (void)request;
    (void)isModified;

    if (response != nullptr) {
        OH_LOG_INFO(LOG_APP, "---Response Interceptor Handler---");
        PrintResponseInfo(response);
    }
    return OH_CONTINUE;
}

// 添加只读响应拦截器
static napi_value AddResponseInterceptor(napi_env env, napi_callback_info info)
{
    napi_value result;

    // 设置拦截器处理函数
    g_responseInterceptor.handler = ResponseInterceptorHandler;

    // 添加拦截器
    int ret = OH_Http_AddReadOnlyInterceptor(&g_responseInterceptor);

    OH_LOG_INFO(LOG_APP, "AddResponseInterceptor ret: %{public}d", ret);
    napi_create_int32(env, ret, &result);
    return result;
}

// 移除拦截器
static napi_value RemoveInterceptor(napi_env env, napi_callback_info info)
{
    napi_value result;

    // 移除拦截器
    int ret = OH_Http_RemoveInterceptor(&g_responseInterceptor);

    OH_LOG_INFO(LOG_APP, "RemoveInterceptor ret: %{public}d", ret);
    napi_create_int32(env, ret, &result);
    return result;
}

// 启用指定组的所有拦截器
static napi_value StartInterceptors(napi_env env, napi_callback_info info)
{
    napi_value result;

    // 启用组ID为1的所有拦截器
    int ret = OH_Http_StartAllInterceptors(1);

    OH_LOG_INFO(LOG_APP, "StartInterceptors ret: %{public}d", ret);
    napi_create_int32(env, ret, &result);
    return result;
}

// 停用指定组的所有拦截器
static napi_value StopInterceptors(napi_env env, napi_callback_info info)
{
    napi_value result;

    // 停用组ID为1的所有拦截器
    int ret = OH_Http_StopAllInterceptors(1);

    OH_LOG_INFO(LOG_APP, "StopInterceptors ret: %{public}d", ret);
    napi_create_int32(env, ret, &result);
    return result;
}

// 删除指定组的所有拦截器
static napi_value RemoveAllInterceptors(napi_env env, napi_callback_info info)
{
    napi_value result;

    // 删除组ID为1的所有拦截器
    int ret = OH_Http_RemoveAllInterceptors(1);

    OH_LOG_INFO(LOG_APP, "RemoveAllInterceptors ret: %{public}d", ret);
    napi_create_int32(env, ret, &result);
    return result;
}
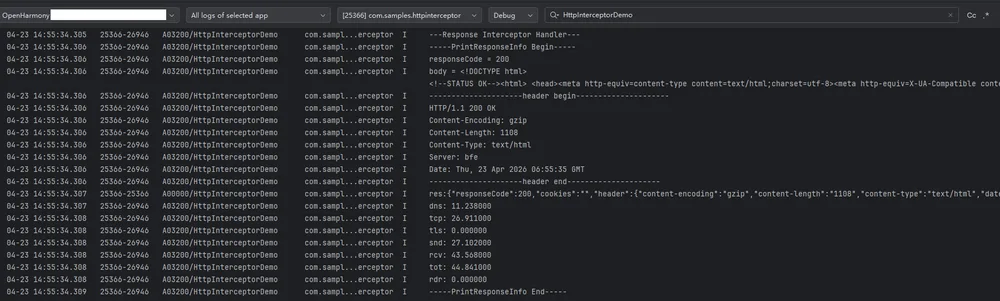
上述代码实现了一个HTTP全局只读响应拦截器,用于监控HTTP响应。在响应拦截器处理函数中,会打印响应的状态码、响应体、响应头以及性能指标等信息。
-
初始化并导出通过N-API封装的
napi_value类型对象,通过外部函数接口将函数提供给JavaScript调用。EXTERN_C_START static napi_value Init(napi_env env, napi_value exports) { napi_property_descriptor desc[] = { {"AddResponseInterceptor", nullptr, AddResponseInterceptor, nullptr, nullptr, nullptr, napi_default, nullptr}, {"RemoveInterceptor", nullptr, RemoveInterceptor, nullptr, nullptr, nullptr, napi_default, nullptr}, {"StartInterceptors", nullptr, StartInterceptors, nullptr, nullptr, nullptr, napi_default, nullptr}, {"StopInterceptors", nullptr, StopInterceptors, nullptr, nullptr, nullptr, napi_default, nullptr}, {"RemoveAllInterceptors", nullptr, RemoveAllInterceptors, nullptr, nullptr, nullptr, napi_default, nullptr}, }; napi_define_properties(env, exports, sizeof(desc) / sizeof(desc[0]), desc); return exports; } EXTERN_C_END -
将上一步中初始化成功的对象通过
RegisterEntryModule函数,使用napi_module_register函数将模块注册到Node.js中。static napi_module demoModule = { .nm_version = 1, .nm_flags = 0, .nm_filename = nullptr, .nm_register_func = Init, .nm_modname = "entry", .nm_priv = ((void *)0), .reserved = {0}, }; extern "C" __attribute__((constructor)) void RegisterEntryModule(void) { napi_module_register(&demoModule); } -
在工程的Index.d.ts文件中定义函数的类型。
export const AddResponseInterceptor: () => number; export const RemoveInterceptor: () => number; export const StartInterceptors: () => number; export const StopInterceptors: () => number; export const RemoveAllInterceptors: () => number; -
在Index.ets文件中对上述封装好的接口进行调用。
import { hilog } from '@kit.PerformanceAnalysisKit'; import httpInterceptor from 'libentry.so'; import { http } from '@kit.NetworkKit'; const LOG_TAG: string = 'HttpInterceptorDemo'; const HTTP_URL_BAIDU: string = "http://www.baidu.com"; @Entry @Component struct Index { @State message: string = 'HTTP Interceptor Demo'; build() { Navigation() { Column() { Text(this.message) .fontSize(20) .margin({ bottom: 20 }) Column({ space: 12 }) { Button('Add Response Interceptor') .id('AddInterceptor') .onClick(() => { let ret = httpInterceptor.AddResponseInterceptor(); hilog.info(0x0000, LOG_TAG, `AddResponseInterceptor ret: ${ret}`); }) Button('Start Interceptors') .id('StartInterceptors') .onClick(() => { let ret = httpInterceptor.StartInterceptors(); hilog.info(0x0000, LOG_TAG, `StartInterceptors ret: ${ret}`); }) Button('Send HTTP Request') .id('networkRequest') .onClick(() => { let httpRequest: http.HttpRequest = http.createHttp(); let options: http.HttpRequestOptions = { method: http.RequestMethod.POST, }; httpRequest.request(HTTP_URL_BAIDU, options, (err: BusinessError, res: http.HttpResponse) => { if (err) { hilog.info(0x0000, LOG_TAG, `request fail, error code: ${err.code}, msg: ${err.message}`); httpRequest.destroy(); } else { hilog.info(0x0000, LOG_TAG, `res:${JSON.stringify(res)}`); httpRequest.destroy(); } }); }) Button('Stop Interceptors') .id('StopInterceptors') .onClick(() => { let ret = httpInterceptor.StopInterceptors(); hilog.info(0x0000, LOG_TAG, `StopInterceptors ret: ${ret}`); }) Button('Remove Interceptor') .id('RemoveInterceptor') .onClick(() => { let ret = httpInterceptor.RemoveInterceptor(); hilog.info(0x0000, LOG_TAG, `RemoveInterceptor ret: ${ret}`); }) Button('Remove All Interceptors') .id('RemoveAllInterceptors') .onClick(() => { let ret = httpInterceptor.RemoveAllInterceptors(); hilog.info(0x0000, LOG_TAG, `RemoveAllInterceptors ret: ${ret}`); }) } } .padding(20) } } } -
配置
CMakeLists.txt,本模块需要用到的共享库是libhttp_interceptor.so,在工程自动生成的CMakeLists.txt中的target_link_libraries中添加此共享库。注意:如图所示,在
add_library中的entry是工程自动生成的module name,若要做修改,需和步骤 3 中.nm_modname保持一致。
-
调用HTTP全局拦截器C API接口要求应用拥有
ohos.permission.INTERNET权限,在module.json5中的requestPermissions项添加该权限。
完成上述步骤后,工程搭建已全部完成,后续可连接设备运行工程并查看日志。
测试步骤
-
连接设备,使用DevEco Studio打开搭建好的工程。
-
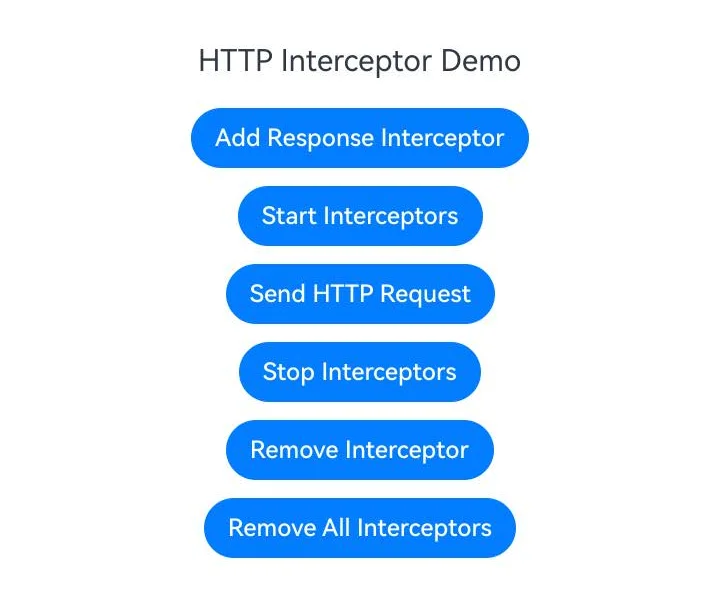
运行工程,设备上会弹出以下图片所示界面。
- 点击
Add Response Interceptor按钮,添加一个HTTP全局只读响应拦截器。

- 点击
Start Interceptors按钮,启用组ID为1的所有拦截器。

- 点击
Send HTTP Request按钮,拦截器会捕获响应并打印相关信息到日志。
- 点击
Stop Interceptors按钮,停用组ID为1的所有拦截器。

- 点击
Remove Interceptor按钮,移除之前添加的拦截器。

- 点击
Remove All Interceptors按钮,删除组ID为1的所有拦截器。

相关实例
针对HTTP全局拦截器的开发,有以下相关实例可供参考:
你可能感兴趣的鸿蒙文章
openharmony 鸿蒙 net-vpnExtension
openharmony 鸿蒙 net-connection-manager
openharmony 鸿蒙 network-terminology
openharmony 鸿蒙 socket-connection