动态布局 (DynamicLayout)
概述
从API version 24开始,支持动态布局容器组件DynamicLayout。DynamicLayout支持在运行时动态切换不同的布局算法,同时保持子组件的状态不变。通过DynamicLayout,开发者可以灵活实现同一种内容在不同场景下的多种布局展示。DynamicLayout组件支持的布局算法类包括RowLayoutAlgorithm、ColumnLayoutAlgorithm、StackLayoutAlgorithm、GridLayoutAlgorithm和自定义布局算法类CustomLayoutAlgorithm。
约束与限制
- 布局算法类使用@ObservedV2装饰,不支持@State装饰器。
- 切换布局算法时,子组件的状态(如输入框内容、滚动位置等)保持不变。
- 在自定义布局算法的onMeasure和onLayout方法中不允许修改状态变量,避免不可预期的行为。
创建DynamicLayout
通过传入LayoutAlgorithm类型入参,创建DynamicLayout组件并设置布局算法。LayoutAlgorithm类型变量支持赋值具体的布局算法类对象,包括内置布局算法和自定义布局算法。
import {
  DynamicLayout, DynamicLayoutAttribute,RowLayoutAlgorithm, ColumnLayoutAlgorithm, LayoutAlgorithm
} from '@kit.ArkUI';

@Entry
@ComponentV2
struct CreateDynamicLayout {
  @Local algorithm: LayoutAlgorithm = new RowLayoutAlgorithm();

  build() {
    Column({ space: 10 }) {
      DynamicLayout(this.algorithm) {
        Text('Item 1')
          .fontSize(16)
          .backgroundColor(0xF5DEB3)
          .padding(10)
        Text('Item 2')
          .fontSize(16)
          .backgroundColor(0xD2B48C)
          .padding(10)
        Text('Item 3')
          .fontSize(16)
          .backgroundColor(0xF5DEB3)
          .padding(10)
      }
      .width('100%')
      .height(150)
      .backgroundColor(0xEFEFEF)

      Button('切换为Column布局')
        .fontSize(16)
        .onClick(() => {
          this.algorithm = new ColumnLayoutAlgorithm();
        })
    }
    .width('100%')
    .padding(20)
  }
}

内置布局算法
线性布局算法RowLayoutAlgorithm和ColumnLayoutAlgorithm具有自适应拉伸、缩放的能力,可以用于界面元素自适应布局的场景。堆叠布局算法StackLayoutAlgorithm具有较强的页面层叠、位置定位能力,可以用于广告、卡片层叠等页面场景。网格布局算法GridLayoutAlgorithm具有较好的规律结构,适合展示同类项目集合,例如显示图片、视频、音乐、新闻、商品等。
RowLayoutAlgorithm

RowLayoutAlgorithm是水平方向线性布局算法,子组件沿水平方向依次排列。该算法支持设置子组件间距、子组件在主轴(水平方向)上的对齐方式、在交叉轴(垂直方向)上的对齐方式,以及是否反转子组件的排列方向。该布局算法与Row组件布局效果一致,详细效果说明请参考线性布局(Row/Column)。下述示例通过修改RowLayoutAlgorithm对象的space、justifyContent、alignItems和isReverse成员变量,调整子组件间距、主轴(水平方向)对齐方式、交叉轴(竖直方向)对齐方式和排列方向。
从API version 24开始,新增RowLayoutAlgorithm的space、justifyContent、alignItems、isReverse属性。
import {
  DynamicLayout, DynamicLayoutAttribute, RowLayoutAlgorithm, LengthMetrics
} from '@kit.ArkUI';

@Entry
@ComponentV2
struct RowLayoutExample {
  @Local algorithm: RowLayoutAlgorithm = new RowLayoutAlgorithm({
    space: LengthMetrics.vp(10),
    alignItems: VerticalAlign.Top,
    justifyContent: FlexAlign.Start,
    isReverse: false
  });

  build() {
    Column({ space: 10 }) {
      DynamicLayout(this.algorithm) {
        Text('Item 1')
          .width(80)
          .height(40)
          .fontSize(14)
          .backgroundColor(0xF5DEB3)
        Text('Item 2')
          .width(80)
          .height(40)
          .fontSize(14)
          .backgroundColor(0xD2B48C)
        Text('Item 3')
          .width(80)
          .height(40)
          .fontSize(14)
          .backgroundColor(0xF5DEB3)
      }
      .width('100%')
      .height(80)
      .backgroundColor(0xEFEFEF)

      Row({ space: 10 }) {
        Button('修改间距')
          .fontSize(14)
          .onClick(() => {
            this.algorithm.space = LengthMetrics.vp(20);
          })
        Button('反转排列')
          .fontSize(14)
          .onClick(() => {
            this.algorithm.isReverse = !this.algorithm.isReverse;
          })
      }

      Row({ space: 10 }) {
        Button('竖直居中')
          .fontSize(14)
          .onClick(() => {
            this.algorithm.alignItems = VerticalAlign.Center;
          })
        Button('水平居中')
          .fontSize(14)
          .onClick(() => {
            this.algorithm.justifyContent = FlexAlign.Center;
          })
      }
    }
    .padding(20)
  }
}
ColumnLayoutAlgorithm

ColumnLayoutAlgorithm是垂直方向线性布局算法,子组件沿垂直方向依次排列。该算法支持设置子组件间距、子组件在主轴(垂直方向)上的对齐方式、在交叉轴(水平方向)上的对齐方式,以及是否反转子组件的排列方向。该布局算法与Column组件布局效果一致,详细效果说明请参考线性布局(Row/Column)。下述示例通过修改ColumnLayoutAlgorithm的space、justifyContent、alignItems和isReverse属性,调整子组件间距、主轴(竖直方向)对齐方式、交叉轴(水平方向)对齐方式和排列方向。
从API version 24开始,新增ColumnLayoutAlgorithm的space、justifyContent、alignItems、isReverse属性。
import {
  DynamicLayout, DynamicLayoutAttribute, ColumnLayoutAlgorithm, LengthMetrics
} from '@kit.ArkUI';

@Entry
@ComponentV2
struct ColumnLayoutExample {
  @Local algorithm: ColumnLayoutAlgorithm = new ColumnLayoutAlgorithm({
    space: LengthMetrics.vp(10),
    alignItems: HorizontalAlign.Start,
    justifyContent: FlexAlign.Start,
    isReverse: false
  });

  build() {
    Column({ space: 10 }) {
      DynamicLayout(this.algorithm) {
        Text('Item 1')
          .width('80%')
          .height(40)
          .fontSize(14)
          .backgroundColor(0xF5DEB3)
        Text('Item 2')
          .width('80%')
          .height(40)
          .fontSize(14)
          .backgroundColor(0xD2B48C)
        Text('Item 3')
          .width('80%')
          .height(40)
          .fontSize(14)
          .backgroundColor(0xF5DEB3)
      }
      .width('100%')
      .height(200)
      .backgroundColor(0xEFEFEF)

      Row({ space: 10 }) {
        Button('修改间距')
          .fontSize(14)
          .onClick(() => {
            this.algorithm.space = LengthMetrics.vp(20);
          })
        Button('反转排列')
          .fontSize(14)
          .onClick(() => {
            this.algorithm.isReverse = !this.algorithm.isReverse;
          })
      }

      Row({ space: 10 }) {
        Button('竖直居中')
          .fontSize(14)
          .onClick(() => {
            this.algorithm.justifyContent = FlexAlign.Center;
          })
        Button('水平居中')
          .fontSize(14)
          .onClick(() => {
            this.algorithm.alignItems = HorizontalAlign.Center;
          })
      }
    }
    .padding(20)
  }
}
StackLayoutAlgorithm

StackLayoutAlgorithm是堆叠布局算法,子组件堆叠排列,后添加的子组件覆盖先添加的子组件。该算法支持通过alignContent设置子组件在容器中的九宫格对齐位置,子组件可以通过layoutGravity属性单独设置自己的对齐方式,优先级高于容器的alignContent。该布局算法与Stack组件布局效果一致,详细效果说明请参考堆叠布局。下述示例通过修改StackLayoutAlgorithm的alignContent属性,调整子组件在容器中的九宫格对齐位置。
从API version 24开始,新增StackLayoutAlgorithm的alignContent属性。
import {
  DynamicLayout, DynamicLayoutAttribute, StackLayoutAlgorithm
} from '@kit.ArkUI';

@Entry
@ComponentV2
struct StackLayoutExample {
  @Local algorithm: StackLayoutAlgorithm = new StackLayoutAlgorithm({
    alignContent: LocalizedAlignment.CENTER
  });

  build() {
    Column() {
      DynamicLayout(this.algorithm) {
        Text('第一层')
          .fontSize(14)
          .width(150)
          .height(150)
          .backgroundColor(0xD2B48C)
          .layoutGravity(LocalizedAlignment.TOP_START)

        Text('第二层')
          .fontSize(14)
          .width(150)
          .height(150)
          .backgroundColor(0xF5DEB3)
          .layoutGravity(LocalizedAlignment.CENTER)

        Text('第三层')
          .fontSize(14)
          .width(100)
          .height(100)
          .backgroundColor(0x8B4513)
      }
      .width(250)
      .height(250)
      .backgroundColor(0xEFEFEF)

      Row({ space: 10 }) {
        Button('顶部居中')
          .fontSize(14)
          .onClick(() => {
            this.algorithm.alignContent = LocalizedAlignment.TOP;
          })
        Button('居中对齐')
          .fontSize(14)
          .onClick(() => {
            this.algorithm.alignContent = LocalizedAlignment.CENTER;
          })
        Button('底部居中')
          .fontSize(14)
          .onClick(() => {
            this.algorithm.alignContent = LocalizedAlignment.BOTTOM;
          })
      }
      .margin({ top: 20 })
    }
    .width('100%')
  }
}
GridLayoutAlgorithm

GridLayoutAlgorithm是垂直方向网格布局算法。该算法支持通过columnsTemplate或ItemFillPolicy设置列数,设置ItemFillPolicy为BREAKPOINT_DEFAULT时行为与Grid一致,行数由子节点数量和列数决定。该算法支持通过LengthMetrics设置行间距和列间距,通过align设置组件在网格中的对齐方式。下述示例修改GridLayoutAlgorithm的columnsTemplate属性调整网格列数。
从API version 24开始,新增GridLayoutAlgorithm的columnsTemplate属性。
import {
  DynamicLayout, DynamicLayoutAttribute, GridLayoutAlgorithm, LengthMetrics
} from '@kit.ArkUI';

export class GridDataSource implements IDataSource {
  private list: string[] = [];
  private listeners: DataChangeListener[] = [];

  constructor(list: string[]) {
    this.list = list;
  }

  totalCount(): number {
    return this.list.length;
  }

  getData(index: number): string {
    return this.list[index];
  }

  registerDataChangeListener(listener: DataChangeListener): void {
    if (this.listeners.indexOf(listener) < 0) {
      this.listeners.push(listener);
    }
  }

  unregisterDataChangeListener(listener: DataChangeListener): void {
    const pos = this.listeners.indexOf(listener);
    if (pos >= 0) {
      this.listeners.splice(pos, 1);
    }
  }

  // 通知控制器数据位置变化
  notifyDataMove(from: number, to: number): void {
    this.listeners.forEach(listener => {
      listener.onDataMove(from, to);
    })
  }

  // 交换元素位置
  public swapItem(from: number, to: number): void {
    let temp: string = this.list[from];
    this.list[from] = this.list[to];
    this.list[to] = temp;
    this.notifyDataMove(from, to);
  }
}

@Entry
@ComponentV2
struct GridLayoutExample {
  numbers: GridDataSource = new GridDataSource([]);
  @Local flag: boolean = false
  @Local gridLayoutAlgorithm: GridLayoutAlgorithm = new GridLayoutAlgorithm({
    columnsTemplate: '1fr 1fr 1fr',
    columnsGap: LengthMetrics.vp(10),
    rowsGap: LengthMetrics.vp(10)
  })

  aboutToAppear() {
    let list: string[] = [];
    for (let i = 0; i < 4; i++) {
      for (let j = 0; j < 3; j++) {
        list.push((i * 3 + j).toString());
      }
    }
    this.numbers = new GridDataSource(list);
  }

  build() {
    Column({ space: 10 }) {
      DynamicLayout(this.gridLayoutAlgorithm) {
        LazyForEach(this.numbers, (day: string) => {
          GridItem() {
            Text(day)
              .fontSize(16)
              .backgroundColor(0xF9CF93)
              .width('100%')
              .height(80)
              .textAlign(TextAlign.Center)
          }
        }, (index: number) => index.toString())
      }.width('100%')
      Button('change gridLayoutAlgorithm columns').onClick(() => {
        this.flag = !this.flag
        if (this.flag) {
          this.gridLayoutAlgorithm.columnsTemplate = '1fr 1fr'
        } else {
          this.gridLayoutAlgorithm.columnsTemplate = '1fr 1fr 1fr'
        }
      })
    }
  }
}
自定义布局算法
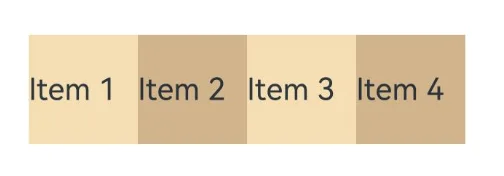
自定义布局算法通过继承CustomLayoutAlgorithm类,重写onMeasure和onLayout方法实现。开发者可以根据具体业务需求,自定义子组件的大小测量和位置排列,实现内置布局算法无法满足的个性化布局效果,如瀑布流、标签云等不规则布局。
自定义布局算法实现指导
通过调用FrameNode的getChildrenCount()和getChild()方法,开发者可以获取所有子组件FrameNode。在onMeasure方法中,调用measure()方法可以自定义测量子组件大小。在onLayout方法中,调用getMeasuredSize()可以获取子组件测量后的尺寸,调用layout()方法可以自定义排列子组件位置。下述示例展示如何重写onMeasure和onLayout方法,调用FrameNode的相关方法实现水平方向线性布局的效果。
import {
  DynamicLayout, DynamicLayoutAttribute, CustomLayoutAlgorithm, FrameNode, LayoutConstraint, Position, LayoutAlgorithm
} from '@kit.ArkUI';

// 自定义布局算法类
class MyCustomLayout extends CustomLayoutAlgorithm {
  onMeasure(self: FrameNode, constraint: LayoutConstraint): void {
    // 1. 获取子组件数量
    const childCount = self.getChildrenCount();
    let totalWidth = 0;
    let maxHeight = 0;
    // 2. 遍历子组件,进行测量
    for (let i = 0; i < childCount; i++) {
      const child = self.getChild(i);
      if (child) {
        // 3. 创建子组件的布局约束
        const childConstraint: LayoutConstraint = {
          maxSize: { width: 150, height: 150},
          minSize: { width: 150, height: 150},
          percentReference: constraint.percentReference
        };
        // 4. 测量子组件
        child.measure(childConstraint);
        // 5. 获取子组件测量后的尺寸
        const childSize = child.getMeasuredSize();
        totalWidth += childSize.width;
        maxHeight = Math.max(maxHeight, childSize.height);
      }
    }
    const measuredSize: Size = {
      width: Math.min(totalWidth, constraint.maxSize.width),
      height: Math.min(maxHeight, constraint.maxSize.height)
    };
    // 6. 设置自身的测量尺寸
    self.setMeasuredSize(measuredSize);
  }

  onLayout(self: FrameNode, position: Position): void {
    // 1. 获取子组件数量
    const childCount = self.getChildrenCount();
    let offsetX = 0;
    // 2. 遍历子组件,设置布局位置
    for (let i = 0; i < childCount; i++) {
      const child = self.getChild(i);
      if (child) {
        // 3. 获取子组件测量后的尺寸
        const childSize = child.getMeasuredSize();
        const childPosition: Position = {
          x: offsetX,
          y: 0
        };
        // 4. 设置子组件的布局位置
        child.layout(childPosition);
        // 5. 更新偏移量
        offsetX += childSize.width;
      }
    }
    // 6. 设置自身的布局位置
    self.setLayoutPosition(position);
  }
}

@Entry
@ComponentV2
struct CustomLayoutBasic {
  @Local algorithm: LayoutAlgorithm = new MyCustomLayout()
  build() {
    Column({ space: 10 }) {
      DynamicLayout(this.algorithm) {
        Text('Item 1')
          .fontSize(14)
          .backgroundColor(0xF5DEB3)
        Text('Item 2')
          .fontSize(14)
          .backgroundColor(0xD2B48C)
        Text('Item 3')
          .fontSize(14)
          .backgroundColor(0xF5DEB3)
        Text('Item 4')
          .fontSize(14)
          .backgroundColor(0xD2B48C)
      }
      .width('100%')
      .height(200)
      .backgroundColor(0xEFEFEF)
    }
    .padding(20)
  }
}
瀑布流布局

下述示例实现了自定义瀑布流布局算法,将子组件按列排列,每列中的子组件依次堆叠,适用于商品展示的场景。
import {
  DynamicLayout, DynamicLayoutAttribute, CustomLayoutAlgorithm, LayoutAlgorithm, FrameNode, LayoutConstraint, Position
} from '@kit.ArkUI';

// 瀑布流布局算法
class WaterfallLayout extends CustomLayoutAlgorithm {
  private columnCount: number = 2;
  private columnGap: number = 10;
  private rowGap: number = 10;

  onMeasure(self: FrameNode, constraint: LayoutConstraint): void {
    const childCount = self.getChildrenCount();
    const columnWidth = (constraint.maxSize.width - (this.columnCount - 1) * this.columnGap) / this.columnCount;
    // 记录每列的当前高度
    const columnHeights: number[] = new Array(this.columnCount).fill(0);
    for (let i = 0; i < childCount; i++) {
      const child = self.getChild(i);
      if (child) {
        // 通过将minSize和maxSize设置为相同值来约束子组件宽度
        const childConstraint: LayoutConstraint = {
          maxSize: {
            width: columnWidth,
            height: constraint.maxSize.height
          },
          minSize: {
            width: columnWidth,
            height: 0
          },
          percentReference: constraint.percentReference
        };
        child.measure(childConstraint);
        // 找到当前高度最小的列
        const minColumn = columnHeights.indexOf(Math.min(...columnHeights));
        columnHeights[minColumn] += child.getMeasuredSize().height + this.rowGap;
      }
    }
    const maxHeight = Math.max(...columnHeights);
    self.setMeasuredSize({
      width: constraint.maxSize.width,
      height: maxHeight
    });
  }

  onLayout(self: FrameNode, position: Position): void {
    const childCount = self.getChildrenCount();
    const measuredSize = self.getMeasuredSize();
    const columnWidth = (measuredSize.width - (this.columnCount - 1) * this.columnGap) / this.columnCount;
    // 记录每列的当前Y坐标
    const columnYs: number[] = new Array(this.columnCount).fill(0);
    for (let i = 0; i < childCount; i++) {
      const child = self.getChild(i);
      if (child) {
        const childSize = child.getMeasuredSize();
        // 找到当前Y坐标最小的列
        const minColumn = columnYs.indexOf(Math.min(...columnYs));
        const x = minColumn * (columnWidth + this.columnGap);
        const y = columnYs[minColumn];
        child.layout({ x, y });
        columnYs[minColumn] += childSize.height + this.rowGap;
      }
    }
    self.setLayoutPosition(position);
  }
}

@Entry
@ComponentV2
struct WaterfallLayoutExample {
  @Local algorithm: LayoutAlgorithm = new WaterfallLayout();

  // 商品数据
  private products: Product[] = [
    { id: '1', name: '时尚运动鞋', price: '¥399', height: 180, image: '商品图' },
    { id: '2', name: '休闲双肩包', price: '¥259', height: 220, image: '商品图' },
    { id: '3', name: '无线蓝牙耳机', price: '¥599', height: 150, image: '商品图' },
    { id: '4', name: '智能手表', price: '¥1299', height: 200, image: '商品图' },
    { id: '5', name: '太阳眼镜', price: '¥199', height: 130, image: '商品图' },
    { id: '6', name: '便携充电宝', price: '¥129', height: 170, image: '商品图' },
    { id: '7', name: '机械键盘', price: '¥459', height: 160, image: '商品图' },
    { id: '8', name: '游戏鼠标', price: '¥189', height: 140, image: '商品图' },
    { id: '9', name: '高清显示器', price: '¥1599', height: 210, image: '商品图' },
    { id: '10', name: '智能音箱', price: '¥299', height: 190, image: '商品图' }
  ];

  // 商品卡片组件
  @Builder ProductCard(product: Product) {
    Column() {
      Text(product.image)
        .fontSize(18)
        .margin({ bottom: 8 })
      Text(product.name)
        .fontSize(14)
        .fontWeight(FontWeight.Medium)
        .fontColor(0x333333)
        .margin({ bottom: 4 })
        .maxLines(1)
        .textOverflow({ overflow: TextOverflow.Ellipsis })
      Text(product.price)
        .fontSize(16)
        .fontColor(0xFF6B35)
        .fontWeight(FontWeight.Bold)
    }
    .width('100%')
    .padding(12)
    .backgroundColor(0xFAFAFA)
    .borderRadius(8)
    .border({ width: 1, color: 0xE0E0E0 })
    .height(product.height)
    .justifyContent(FlexAlign.Center)
  }

  build() {
    Column() {
      Text('商品列表 - 瀑布流布局')
        .fontSize(18)
        .fontWeight(FontWeight.Bold)
        .margin({ bottom: 20 })

      Scroll() {
        DynamicLayout(this.algorithm) {
          ForEach(this.products, (product: Product) => {
            this.ProductCard(product)
          })
        }
        .width('100%')
        .backgroundColor(0xEFEFEF)
        .borderRadius(12)
        .padding(10)
      }
      .scrollable(ScrollDirection.Vertical)
      .scrollBar(BarState.Auto)
      .edgeEffect(EdgeEffect.Spring)
      .width('100%')
      .layoutWeight(1)

      Text('商品卡片自动分配到高度最小的列')
        .fontSize(14)
        .fontColor(Color.Gray)
        .margin({ top: 12 })
    }
    .padding(20)
    .width('100%')
    .height('100%')
  }
}

// 商品数据模型
interface Product {
  id: string;
  name: string;
  price: string;
  height: number;
  image: string;
}
网格布局
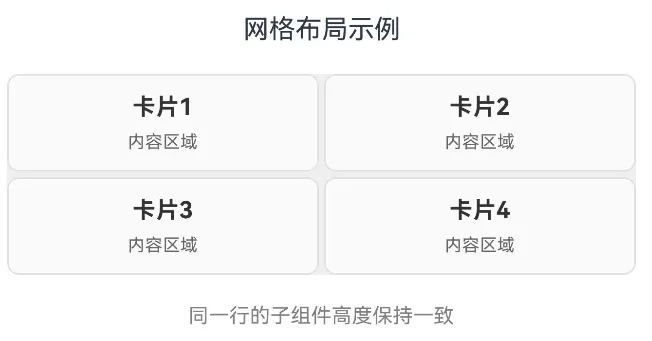
下述示例实现一个自定义网格布局算法,将子组件按网格排列,同一行的子组件高度保持一致。
import {
  DynamicLayout, DynamicLayoutAttribute, CustomLayoutAlgorithm, LayoutAlgorithm, FrameNode, LayoutConstraint, Position
} from '@kit.ArkUI';

// 2x2网格布局算法
export class GridLayout extends CustomLayoutAlgorithm {
  private gap: number = 12;
  private itemHeights: number[] = [];

  onMeasure(self: FrameNode, constraint: LayoutConstraint): void {
    const childCount = self.getChildrenCount();
    const columns = 2;
    const itemWidth = (constraint.maxSize.width - (columns - 1) * this.gap) / columns;
    this.itemHeights = [];

    // 第一遍测量:获取每个子组件的理想高度
    for (let i = 0; i < childCount; i++) {
      const child = self.getChild(i);
      if (child) {
        const childConstraint: LayoutConstraint = {
          maxSize: { width: itemWidth, height: Number.MAX_VALUE },
          minSize: { width: itemWidth, height: 0 },
          percentReference: constraint.percentReference
        };
        child.measure(childConstraint);
        this.itemHeights.push(child.getMeasuredSize().height);
      }
    }

    // 计算每行的最大高度
    const rows = Math.ceil(childCount / columns);
    const rowHeights: number[] = [];
    for (let r = 0; r < rows; r++) {
      let maxRowHeight = 0;
      for (let c = 0; c < columns; c++) {
        const index = r * columns + c;
        if (index < this.itemHeights.length && this.itemHeights[index] > maxRowHeight) {
          maxRowHeight = this.itemHeights[index];
        }
      }
      rowHeights.push(maxRowHeight);
    }

    // 计算总高度
    const totalHeight = rowHeights.reduce((sum, h) => sum + h, 0) + (rows - 1) * this.gap;

    // 第二遍测量:使用每行的统一高度重新测量子组件
    for (let i = 0; i < childCount; i++) {
      const child = self.getChild(i);
      if (child) {
        const row = Math.floor(i / columns);
        const rowHeight = rowHeights[row];
        const childConstraint: LayoutConstraint = {
          maxSize: { width: itemWidth, height: rowHeight },
          minSize: { width: itemWidth, height: rowHeight },
          percentReference: constraint.percentReference
        };
        child.measure(childConstraint);
      }
    }

    self.setMeasuredSize({
      width: constraint.maxSize.width,
      height: totalHeight
    });
  }

  onLayout(self: FrameNode, position: Position): void {
    const childCount = self.getChildrenCount();
    const measuredSize = self.getMeasuredSize();
    const columns = 2;
    const itemWidth = (measuredSize.width - (columns - 1) * this.gap) / columns;

    // 重新计算每行的最大高度
    const rows = Math.ceil(childCount / columns);
    const rowHeights: number[] = [];
    for (let r = 0; r < rows; r++) {
      let maxRowHeight = 0;
      for (let c = 0; c < columns; c++) {
        const index = r * columns + c;
        if (index < this.itemHeights.length && this.itemHeights[index] > maxRowHeight) {
          maxRowHeight = this.itemHeights[index];
        }
      }
      rowHeights.push(maxRowHeight);
    }

    for (let i = 0; i < childCount; i++) {
      const child = self.getChild(i);
      if (child) {
        const row = Math.floor(i / columns);
        const col = i % columns;
        const x = col * (itemWidth + this.gap);
        const y = row === 0 ? 0 : rowHeights.slice(0, row).reduce((sum, h) => sum + h, 0) + row * this.gap;
        child.layout({ x, y });
      }
    }

    self.setLayoutPosition(position);
  }
}

@Entry
@ComponentV2
struct GridLayoutExample {
  @Local algorithm: LayoutAlgorithm = new GridLayout();

  build() {
    Column() {
      Text('网格布局示例')
        .fontSize(18)
        .margin({ bottom: 20 })

      DynamicLayout(this.algorithm) {
        ForEach(['卡片1', '卡片2', '卡片3', '卡片4'], (title: string, index: number) => {
          Column() {
            Text(title)
              .fontSize(16)
              .fontWeight(FontWeight.Bold)
              .fontColor(0x333333)
              .margin({ bottom: 8 })
            Text('内容区域')
              .fontSize(12)
              .fontColor(0x666666)
          }
          .width('100%')
          .padding(12)
          .backgroundColor(0xFAFAFA)
          .borderRadius(8)
          .border({ width: 1, color: 0xE0E0E0 })
        })
      }
      .width('100%')
      .backgroundColor(0xEFEFEF)
      .borderRadius(12)
      .padding(12)

      Text('同一行的子组件高度保持一致')
        .fontSize(14)
        .fontColor(Color.Gray)
        .margin({ top: 20 })
    }
    .padding(20)
    .width('100%')
  }
}
标签云布局
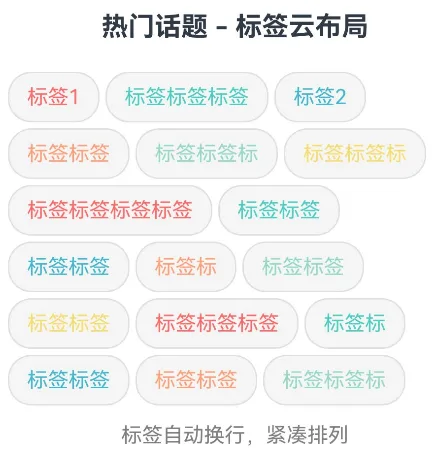
下述示例实现一个自定义标签云布局,标签自动换行排列,适合展示搜索历史、热门标签、技能标签等不规则布局的场景。
import {
  DynamicLayout, DynamicLayoutAttribute, CustomLayoutAlgorithm, LayoutAlgorithm, FrameNode, LayoutConstraint, Position
} from '@kit.ArkUI';

// 标签云布局算法
class TagCloudLayout extends CustomLayoutAlgorithm {
  private horizontalGap: number = 12;
  private verticalGap: number = 12;

  onMeasure(self: FrameNode, constraint: LayoutConstraint): void {
    const childCount = self.getChildrenCount();
    const maxWidth = constraint.maxSize.width;

    let currentLineWidth = 0;
    let totalHeight = 0;
    let maxLineWidth = 0;

    for (let i = 0; i < childCount; i++) {
      const child = self.getChild(i);
      if (child) {
        // 测量子组件,不限制宽高
        const childConstraint: LayoutConstraint = {
          maxSize: { width: maxWidth, height: Number.MAX_VALUE },
          minSize: { width: 0, height: 0 },
          percentReference: constraint.percentReference
        };
        child.measure(childConstraint);
        const childSize = child.getMeasuredSize();
        // 检查是否需要换行
        if (currentLineWidth + childSize.width > maxWidth && currentLineWidth > 0) {
          // 换行
          totalHeight += this.verticalGap;
          currentLineWidth = childSize.width;
          totalHeight += childSize.height;
          maxLineWidth = Math.max(maxLineWidth, currentLineWidth - this.horizontalGap);
        } else {
          // 继续当前行
          currentLineWidth += childSize.width + this.horizontalGap;
          if (i === 0) {
            totalHeight = childSize.height;
          }
          maxLineWidth = Math.max(maxLineWidth, currentLineWidth - this.horizontalGap);
        }
      }
    }
    self.setMeasuredSize({
      width: Math.min(maxLineWidth, maxWidth),
      height: totalHeight
    });
  }

  onLayout(self: FrameNode, position: Position): void {
    const childCount = self.getChildrenCount();
    const measuredSize = self.getMeasuredSize();
    const maxWidth = measuredSize.width;

    let currentX = 0;
    let currentY = 0;
    let currentLineHeight = 0;

    for (let i = 0; i < childCount; i++) {
      const child = self.getChild(i);
      if (child) {
        const childSize = child.getMeasuredSize();
        // 检查是否需要换行
        if (currentX + childSize.width > maxWidth && currentX > 0) {
          // 换行
          currentY += currentLineHeight + this.verticalGap;
          currentX = 0;
          currentLineHeight = 0;
        }
        // 布局子组件
        child.layout({ x: currentX, y: currentY })
        // 更新位置
        currentX += childSize.width + this.horizontalGap;
        currentLineHeight = Math.max(currentLineHeight, childSize.height);
      }
    }
    self.setLayoutPosition(position);
  }
}

@Entry
@ComponentV2
struct TagCloudExample {
  @Local algorithm: LayoutAlgorithm = new TagCloudLayout();

  // 热门标签数据
  private tags: string[] = [
    '标签1', '标签标签标签', '标签2', '标签标签', '标签标签标',
    '标签标签标', '标签标签标签标签', '标签标签', '标签标签',
    '标签标', '标签标签', '标签标签', '标签标签标签',
    '标签标', '标签标签', '标签标签', '标签标签标'
  ];

  // 标签组件
  @Builder TagItem(tag: string, index: number) {
    Text(tag)
      .fontSize(14)
      .fontColor([0xFF6B6B, 0x4ECDC4, 0x45B7D1, 0xFFA07A, 0x98D8C8, 0xF7DC6F][index % 6])
      .padding({ left: 12, right: 12, top: 8, bottom: 8 })
      .backgroundColor(0xF5F5F5)
      .borderRadius(16)
      .border({ width: 1, color: 0xE0E0E0 })
  }

  build() {
    Column() {
      Text('热门话题 - 标签云布局')
        .fontSize(18)
        .fontWeight(FontWeight.Bold)
        .margin({ bottom: 20 })

      Scroll() {
        DynamicLayout(this.algorithm) {
          ForEach(this.tags, (tag: string, index: number) => {
            this.TagItem(tag, index)
          }, (tag: string, index: number) => `${index}_${tag}`)
        }
        .width('100%')
        .padding(16)
      }
      .scrollable(ScrollDirection.Vertical)
      .scrollBar(BarState.Auto)
      .edgeEffect(EdgeEffect.Spring)
      .width('100%')

      Text('标签自动换行,紧凑排列')
        .fontSize(14)
        .fontColor(Color.Gray)
        .margin({ top: 12 })
    }
    .padding(20)
    .width('100%')
    .height('100%')
  }
}
切换布局算法

DynamicLayout在切换布局算法时会保持子组件的状态不变,比如输入框内容、开关状态、进度条值等。下述示例展示TextInput、Toggle、Slider和CheckBox组件在布局切换过程中保持状态,同时使用animateTo为布局切换添加平滑的动画效果。
import {
  DynamicLayout, DynamicLayoutAttribute, ColumnLayoutAlgorithm, LayoutAlgorithm, curves, LengthMetrics,
  GridLayoutAlgorithm
} from '@kit.ArkUI';

@Entry
@ComponentV2
struct StatePreservationExample {
  @Local algorithm: LayoutAlgorithm = new ColumnLayoutAlgorithm({
    space: LengthMetrics.vp(12)
  });

  build() {
    Column() {
      Text('布局切换状态保持示例')
        .fontSize(18)
        .margin({ bottom: 20 })

      // 使用animateTo为布局切换添加动画效果
      DynamicLayout(this.algorithm) {
        // 子组件1:带输入框的卡片
        Column() {
          Text('输入框')
            .fontSize(14)
            .fontWeight(FontWeight.Bold)
            .fontColor(0x333333)
            .margin({ bottom: 8 })
          TextInput({ placeholder: '请输入' })
            .width('100%')
            .height(36)
            .fontSize(12)
        }
        .width('100%')
        .padding(12)
        .backgroundColor(0x80F0F0F0)
        .borderRadius(8)

        // 子组件2:带开关的卡片
        Column() {
          Text('开关')
            .fontSize(14)
            .fontWeight(FontWeight.Bold)
            .fontColor(0x333333)
            .margin({ bottom: 8 })
          Toggle({ type: ToggleType.Switch, isOn: true })
            .selectedColor(0xD4D4D4)
            .height(26)
            .width(52)
        }
        .width('100%')
        .padding(12)
        .backgroundColor(0x80F0F0F0)
        .borderRadius(8)

        // 子组件3:带进度条的卡片
        Column() {
          Text('进度条')
            .fontSize(14)
            .fontWeight(FontWeight.Bold)
            .fontColor(0x333333)
            .margin({ bottom: 8 })
          Slider({ value: 60, min: 0, max: 100 })
            .width('100%')
            .trackColor(0xD4D4D4)
            .selectedColor(0xD4D4D4)
            .height(36)
        }
        .width('100%')
        .padding(12)
        .backgroundColor(0x80F0F0F0)
        .borderRadius(8)

        // 子组件4:带复选框的卡片
        Column() {
          Text('复选框')
            .fontSize(14)
            .fontWeight(FontWeight.Bold)
            .fontColor(0x333333)
            .margin({ bottom: 8 })
          Row() {
            Checkbox({ name: 'check1' })
              .select(false)
              .selectedColor(0xD4D4D4)
            Text('记住密码')
              .fontSize(12)
              .fontColor(0x333333)
              .margin({ left: 8 })
          }
          .height(36)
        }
        .width('100%')
        .padding(12)
        .backgroundColor(0x80F0F0F0)
        .borderRadius(8)
      }
      .width('100%')
      .borderRadius(12)
      .padding(12)

      Row({ space: 10 }) {
        Button('列表布局')
          .onClick(() => {
            this.getUIContext()?.animateTo({ duration: 300, curve: curves.springMotion() }, () => {
              this.algorithm = new ColumnLayoutAlgorithm({
                space: LengthMetrics.vp(12)
              });
            });
          })
        Button('网格布局')
          .onClick(() => {
            this.getUIContext()?.animateTo({ duration: 300, curve: curves.springMotion() }, () => {
              this.algorithm = new GridLayoutAlgorithm({
                columnsTemplate: '1fr 1fr',
                columnsGap: LengthMetrics.vp(10),
                rowsGap: LengthMetrics.vp(10)
              });
            });
          })
      }
      .margin({ top: 20 })

      Text('切换布局后,子组件状态保持不变')
        .fontSize(14)
        .fontColor(Color.Gray)
        .margin({ top: 12 })
    }
    .padding(20)
    .width('100%')
  }
}
DynamicLayout支持以下几种方式触发重新布局:
-
通过状态变量切换布局算法。
开发者使用@Local装饰器修饰布局算法变量,可以实现运行时动态切换布局。
import {
  DynamicLayout, DynamicLayoutAttribute, RowLayoutAlgorithm, ColumnLayoutAlgorithm,
  StackLayoutAlgorithm, GridLayoutAlgorithm, LayoutAlgorithm, LengthMetrics
} from '@kit.ArkUI';

@Entry
@ComponentV2
struct LayoutSwitchExample {
  @Local algorithm: LayoutAlgorithm = new RowLayoutAlgorithm({
    space: LengthMetrics.vp(10),
    alignItems: VerticalAlign.Center
  });
  @Local childWidth: string = '20%'
  @Local childHeight: string = '20%'

  build() {
    Column() {
      // 使用状态变量控制布局算法
      DynamicLayout(this.algorithm) {
        Text('Item 1')
          .width(this.childWidth)
          .height(this.childHeight)
          .fontSize(14)
          .textAlign(TextAlign.Center)
          .backgroundColor(0xF5DEB3)
          .borderRadius(8)
          .layoutGravity(LocalizedAlignment.TOP_START)
        Text('Item 2')
          .width(this.childWidth)
          .height(this.childHeight)
          .fontSize(14)
          .textAlign(TextAlign.Center)
          .backgroundColor(0xF5DEB3)
          .borderRadius(8)
          .layoutGravity(LocalizedAlignment.TOP_END)
        Text('Item 3')
          .width(this.childWidth)
          .height(this.childHeight)
          .fontSize(14)
          .textAlign(TextAlign.Center)
          .backgroundColor(0xF5DEB3)
          .borderRadius(8)
          .layoutGravity(LocalizedAlignment.BOTTOM_START)
        Text('Item 4')
          .width(this.childWidth)
          .height(this.childHeight)
          .fontSize(14)
          .textAlign(TextAlign.Center)
          .backgroundColor(0xF5DEB3)
          .borderRadius(8)
          .layoutGravity(LocalizedAlignment.BOTTOM_END)
      }
      .width(300)
      .height(280)
      .backgroundColor(0xEFEFEF)
      .borderRadius(12)
      .padding(10)

      Column({ space: 10 }) {
        Row({ space: 10 }) {
          Button('Row布局')
            .onClick(() => {
              this.algorithm = new RowLayoutAlgorithm({
                space: LengthMetrics.vp(10),
                alignItems: VerticalAlign.Center
              });
              this.childWidth = '20%'
              this.childHeight = '20%'
            })
          Button('Column布局')
            .onClick(() => {
              this.algorithm = new ColumnLayoutAlgorithm({
                space: LengthMetrics.vp(10),
                alignItems: HorizontalAlign.Center
              });
              this.childWidth = '20%'
              this.childHeight = '20%'
            })
        }
        Row({ space: 10 }) {
          Button('Stack布局')
            .onClick(() => {
              this.algorithm = new StackLayoutAlgorithm({
                alignContent: LocalizedAlignment.CENTER
              });
              this.childWidth = '20%'
              this.childHeight = '20%'
            })
          Button('Grid布局')
            .onClick(() => {
              this.algorithm = new GridLayoutAlgorithm({
                columnsTemplate: '1fr 1fr',
                rowsGap: LengthMetrics.vp(5),
                columnsGap: LengthMetrics.vp(5)
              });
              this.childWidth = '100%'
              this.childHeight = '50%'
            })
        }
      }
      .margin({ top: 20 })
    }
    .padding(20)
  }
}
-

通过条件运算符切换布局算法。
开发者可以使用条件运算符,根据状态变量的值选择合适的布局算法。
import {
  DynamicLayout, DynamicLayoutAttribute, RowLayoutAlgorithm, ColumnLayoutAlgorithm, LengthMetrics
} from '@kit.ArkUI';

@Entry
@ComponentV2
struct ConditionalLayoutExample {
  @Local isHorizontal: boolean = true;

  build() {
    Column() {
      // 使用三元运算符根据条件选择布局算法
      DynamicLayout(
        this.isHorizontal
          ? new RowLayoutAlgorithm({ space: LengthMetrics.vp(10) })
          : new ColumnLayoutAlgorithm({ space: LengthMetrics.vp(10) })
      ) {
        Text('Item 1')
          .width(80)
          .height(40)
          .fontSize(14)
          .backgroundColor(0xF5DEB3)
        Text('Item 2')
          .width(80)
          .height(40)
          .fontSize(14)
          .backgroundColor(0xD2B48C)
        Text('Item 3')
          .width(80)
          .height(40)
          .fontSize(14)
          .backgroundColor(0xF5DEB3)
      }
      .width('100%')
      .height(150)
      .backgroundColor(0xEFEFEF)

      Button('切换方向')
        .onClick(() => {
          this.isHorizontal = !this.isHorizontal;
        })
    }
    .padding(20)
  }
}
-
通过修改算法属性触发重新布局。

布局算法类使用@ObservedV2装饰,布局算法成员属性使用@Trace装饰,修改属性值可以触发DynamicLayout组件重新布局。
import {
  DynamicLayout, DynamicLayoutAttribute, RowLayoutAlgorithm, LengthMetrics
} from '@kit.ArkUI';

@Entry
@ComponentV2
struct PropertyChangeExample {
  @Local algorithm: RowLayoutAlgorithm = new RowLayoutAlgorithm({
    space: LengthMetrics.vp(10),
    justifyContent: FlexAlign.Start
  });

  build() {
    Column() {
      DynamicLayout(this.algorithm) {
        Text('Item 1')
          .width(60)
          .height(40)
          .fontSize(14)
          .backgroundColor(0xF5DEB3)
        Text('Item 2')
          .width(60)
          .height(40)
          .fontSize(14)
          .backgroundColor(0xD2B48C)
        Text('Item 3')
          .width(60)
          .height(40)
          .fontSize(14)
          .backgroundColor(0xF5DEB3)
      }
      .width('100%')
      .height(80)
      .backgroundColor(0xEFEFEF)

      Row({ space: 10 }) {
        Button('增加间距')
          .fontSize(14)
          .onClick(() => {
            // 修改space属性触发重新布局
            const currentSpace = this.algorithm.space?.value;
            this.algorithm.space = LengthMetrics.vp(currentSpace as number + 5);
          })
        Button('居中对齐')
          .fontSize(14)
          .onClick(() => {
            // 修改justifyContent属性触发重新布局
            this.algorithm.justifyContent = FlexAlign.Center;
          })
        Button('两端对齐')
          .fontSize(14)
          .onClick(() => {
            this.algorithm.justifyContent = FlexAlign.SpaceBetween;
          })
      }
      .margin({ top: 20 })
    }
    .padding(20)
  }
}
-
响应式布局算法切换。
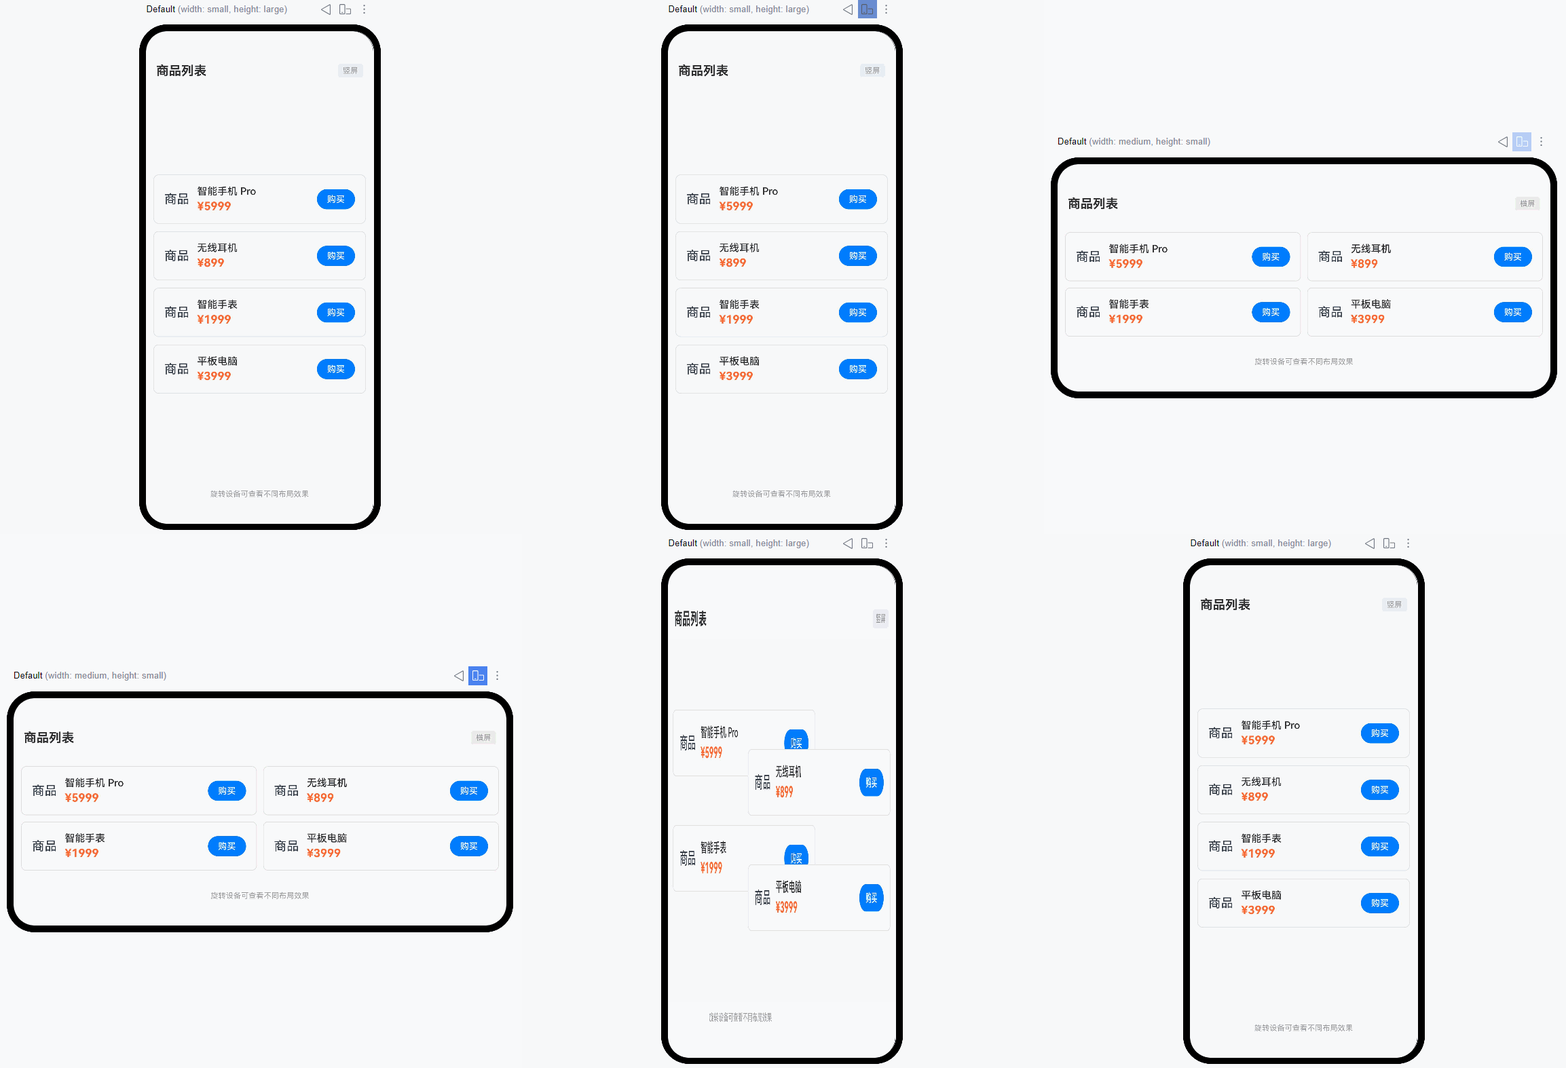
开发者可以结合mediaquery接口监听屏幕方向变化,自动切换商品列表的布局方式。竖屏时使用列表视图(每行一个商品),横屏时使用网格视图(2x2网格布局)。
import {
  DynamicLayout, DynamicLayoutAttribute, ColumnLayoutAlgorithm, LayoutAlgorithm, LengthMetrics, mediaquery,
  GridLayoutAlgorithm
} from '@kit.ArkUI';

// 商品数据模型
interface Product {
  id: string;
  name: string;
  price: string;
  image: string;
}

@Entry
@ComponentV2
struct ProductListExample {
  @Local algorithm: LayoutAlgorithm = new ColumnLayoutAlgorithm({
    space: LengthMetrics.vp(12)
  });
  @Local currentOrientation: string = '竖屏';
  // 商品数据
  private products: Product[] = [
    { id: '1', name: '智能手机 Pro', price: '¥5999', image: '商品' },
    { id: '2', name: '无线耳机', price: '¥899', image: '商品' },
    { id: '3', name: '智能手表', price: '¥1999', image: '商品' },
    { id: '4', name: '平板电脑', price: '¥3999', image: '商品' }
  ];

  // 监听横屏事件
  listener: mediaquery.MediaQueryListener = this.getUIContext().getMediaQuery().matchMediaSync('(orientation: landscape)');

  // 当满足媒体查询条件时,触发回调
  onOrientationChange(mediaQueryResult: mediaquery.MediaQueryResult) {
    if (mediaQueryResult.matches) {
      // 横屏:使用2x2网格布局
      this.algorithm = new GridLayoutAlgorithm({
        columnsTemplate: '1fr 1fr',
        columnsGap: LengthMetrics.vp(10),
        rowsGap: LengthMetrics.vp(10)
      });
      this.currentOrientation = '横屏';
    } else {
      // 竖屏:使用列表布局(每行一个商品)
      this.algorithm = new ColumnLayoutAlgorithm({
        space: LengthMetrics.vp(12)
      });
      this.currentOrientation = '竖屏';
    }
  }

  aboutToAppear() {
    // 绑定回调函数
    this.listener.on('change', (mediaQueryResult: mediaquery.MediaQueryResult) => {
      this.onOrientationChange(mediaQueryResult);
    });
  }

  aboutToDisappear() {
    // 解绑listener中注册的回调函数
    this.listener.off('change');
  }

  // 商品卡片组件
  @Builder ProductCard(product: Product) {
    Row() {
      Text(product.image)
        .fontSize(20)
        .margin({ right: 12 })
      Column() {
        Text(product.name)
          .fontSize(16)
          .fontWeight(FontWeight.Medium)
          .fontColor(0x333333)
          .margin({ bottom: 4 })
        Text(product.price)
          .fontSize(18)
          .fontColor(0xFF6B35)
          .fontWeight(FontWeight.Bold)
      }
      .alignItems(HorizontalAlign.Start)
      .layoutWeight(1)
      .margin({ right: 12 })
      Button('购买')
        .fontSize(14)
        .height(32)
    }
    .width('100%')
    .padding(16)
    .backgroundColor(0xFAFAFA)
    .borderRadius(8)
    .border({ width: 1, color: 0xE0E0E0 })
  }

  build() {
    Column() {
      // 标题栏
      Row() {
        Text('商品列表')
          .fontSize(20)
          .fontWeight(FontWeight.Bold)
          .fontColor(0x333333)
        Blank()
        Text(`${this.currentOrientation}`)
          .fontSize(12)
          .fontColor(0x999999)
          .padding({ left: 8, right: 8, top: 4, bottom: 4 })
          .backgroundColor(0xF0F0F0)
          .borderRadius(4)
      }
      .width('100%')
      .padding({ left: 16, right: 16, top: 12, bottom: 12 })
      .backgroundColor(Color.White)

      // 商品列表
      Scroll() {
        DynamicLayout(this.algorithm) {
          ForEach(this.products, (product: Product) => {
            this.ProductCard(product)
          })
        }
        .width('100%')
        .layoutWeight(1)
        .padding(12)
      }
      .layoutWeight(1)
      .width('100%')
      .backgroundColor(0xF5F5F5)

      // 提示信息
      Text('旋转设备可查看不同布局效果')
        .fontSize(12)
        .fontColor(0x999999)
        .textAlign(TextAlign.Center)
        .padding(12)
        .width('100%')
        .backgroundColor(Color.White)
    }
    .width('100%')
    .height('100%')
  }
}
你可能感兴趣的鸿蒙文章
openharmony 鸿蒙 arkts-common-components-text-input
openharmony 鸿蒙 arkts-select-component-faq
openharmony 鸿蒙 js-framework-syntax-css
openharmony 鸿蒙 arkts-popup-and-menu-components-popup
openharmony 鸿蒙 arkts-navigation-animation-faq
openharmony 鸿蒙 arkts-rotation-transition-animation
openharmony 鸿蒙 arkts-popup-and-menu-components-uicontext-popup