Using AVScreenCapture in Basic Scenarios
Screen capture enables you to collect screen data for scenarios like screen recording, meeting sharing, and live streaming. By calling the C APIs of the AVScreenCapture module, you can collect audio and video data from both internal and external sources. The AVScreenCapture module works with the Window and Graphics modules to complete video capture.
Starting from API version 22, the following capabilities are introduced to screen capture on PCs/2-in-1 devices:
- Capture while the screen is off but not locked: This requires the ohos.permission.TIMEOUT_SCREENOFF_DISABLE_LOCK permission. For details about the permission configuration, see Declaring Permissions.
- Capture without privacy protection pop-ups: This requires the ohos.permission.CUSTOM_SCREEN_RECORDING permission. For details about the permission configuration, see Requesting Restricted Permissions.
Workflow Overview
Basic screen capture involves creating an AVScreenCapture instance, configuring audio and video parameters, setting callbacks, starting and stopping capture, processing results, and releasing resources.
On this basis, you can implement advanced configurations for specific scenarios like video recording or live streaming. For details, see Using AVScreenCapture in Custom Scenarios.
The following figure shows the basic workflow.

The captured screen content can be output in the following forms:
-
As files: The captured content can be saved as a file, which can be played or shared.
-
As streams: The stream can be processed based on the scenario. For example, the stream can be transferred to other modules for desktop sharing or live video streaming.
Constraints
-
When using AVScreenCapture, you must be aware of its state transitions. APIs should only be called in the appropriate states, as calling them in an incorrect state will cause errors. You should check the state before attempting transitions to avoid exceptions.
-
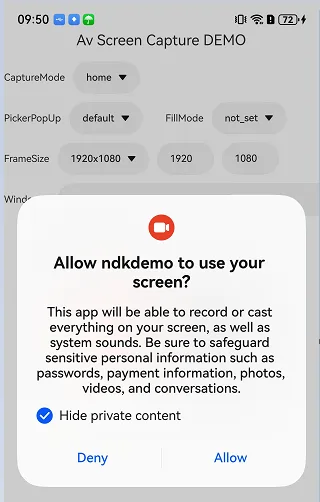
When screen capture starts, a privacy protection pop-up is displayed, containing the Hide private content option. If this option is selected, private information (such as banner notifications, the control panel, or call screen) will be masked. The specific private information may vary by product. The actual captured result prevails.
Privacy protection pop-up:
General Development Steps
Importing Dependencies
Link the dynamic libraries in the CMake script.
target_link_libraries(entry PUBLIC libnative_avscreen_capture.so libnative_buffer.so libnative_media_core.so)
Add the header files.
#include "napi/native_api.h"
#include <multimedia/player_framework/native_avscreen_capture.h>
#include <multimedia/player_framework/native_avscreen_capture_base.h>
#include <multimedia/player_framework/native_avscreen_capture_errors.h>
#include <multimedia/player_framework/native_avbuffer.h>
#include <native_buffer/native_buffer.h>
#include <vector>
Creating an AVScreenCapture Instance
Instantiate the object by creating an OH_AVScreenCapture instance by calling OH_AVScreenCapture_Create.
OH_AVScreenCapture* capture = OH_AVScreenCapture_Create();
Configuring Audio Capture Parameters
After creating the AVScreenCapture instance, configure the required audio parameters OH_AudioInfo, including internal audio information, microphone audio information OH_AudioCaptureInfo, and output specifications OH_AudioEncInfo.
If microphone audio capture needs to be configured, do as follows:
- Configure the ohos.permission.MICROPHONE permission. For details, see Requesting User Authorization.
- Apply for a continuous task. For details, see Continuous Task.
When you save the captured content to a file, only internal capture is enabled by default. The microphone can be dynamically enabled or disabled during capture. Once enabled, both internal and external (microphone) audio can be recorded simultaneously.
Internal audio information must be configured. Microphone audio information can be set as needed based on the actual scenario.
// Microphone capture information. If both internal and microphone audio are set, their parameters must be consistent.
OH_AudioCaptureInfo micCapInfo = {
    .audioSampleRate = 48000,
    .audioChannels = 2,
    .audioSource = OH_MIC
};
// Internal audio capture information, which is mandatory. If both internal and microphone audio are set, their parameters must be consistent.
OH_AudioCaptureInfo innerCapInfo = {
    .audioSampleRate = 48000,
    .audioChannels = 2,
    .audioSource = OH_ALL_PLAYBACK
};
// Audio output specifications for screen capture.
OH_AudioEncInfo audioEncInfo = {
    .audioBitrate = 48000,
    .audioCodecformat = OH_AAC_LC
};
OH_AudioInfo audioInfo = {
    .micCapInfo = micCapInfo,
    .innerCapInfo = innerCapInfo,
    .audioEncInfo = audioEncInfo
};
// You can set the microphone switch separately.
bool isMic = true;
OH_AVScreenCapture_SetMicrophoneEnabled(capture, isMic);
Configuring Video Capture Parameters
The video capture information OH_VideoInfo includes the input specifications OH_VideoCaptureInfo and output specifications OH_VideoEncInfo.
// Input specifications for screen capture.
OH_VideoCaptureInfo videoCapInfo = {
    .videoFrameWidth = 768,
    .videoFrameHeight = 1280,
    .videoSource = OH_VIDEO_SOURCE_SURFACE_RGBA
 };
// Output specifications for screen capture.
OH_VideoEncInfo videoEncInfo = {
    .videoCodec = OH_H264,
    .videoBitrate = 2000000,
    .videoFrameRate = 30
 };
OH_VideoInfo videoInfo = {
    .videoCapInfo = videoCapInfo,
    .videoEncInfo = videoEncInfo
};
Initializing the AVScreenCapture Instance Configuration
The AVScreenCapture instance configuration OH_AVScreenRecorderConfig includes the capture data format OH_VideoInfo, audio and video capture parameters OH_AudioInfo, and screen capture mode OH_CaptureMode, which can be OH_CAPTURE_HOME_SCREEN, OH_CAPTURE_SPECIFIED_SCREEN, or OH_CAPTURE_SPECIFIED_WINDOW.
After configuration, call OH_AVScreenCapture_Init to apply the settings to the OH_AVScreenCapture instance.
NOTE
On PCs/2-in-1 devices, different screen capture modes trigger different pop-up behaviors. For details, see PC/2-in-1 Pop-up Mode Configuration.
// Initialize the screen capture parameters by passing in an OH_AVScreenRecorderConfig struct.
OH_AVScreenCaptureConfig config = {
    .dataType = OH_ORIGINAL_STREAM,
    .audioInfo = audioInfo,
    .captureMode = OH_CAPTURE_HOME_SCREEN, // Set the screen capture mode.
    .videoInfo = videoInfo
};
OH_AVScreenCapture_Init(capture, config);
Setting Callbacks for Data Updates, State Changes, and Error Reporting
Callback functions are used to listen for events during screen capture, such as errors, audio/video stream generation, and state changes. For details, Error Callback, Status Callback, and Data Obtaining Callback.
// Set callbacks.
// OnError(), a callback function invoked when an error occurs.
void OnError(OH_AVScreenCapture *capture, int32_t errorCode, void *userData) {
    (void)capture;
    // Handle the event based on the error code.
    (void)errorCode;
    (void)userData;
}

// OnStateChange(), a callback function invoked when the state changes.
void OnStateChange(struct OH_AVScreenCapture *capture, OH_AVScreenCaptureStateCode stateCode, void *userData) {
    (void)capture;
    if (stateCode == OH_AVScreenCaptureStateCode::OH_SCREEN_CAPTURE_STATE_CANCELED) { // Modify the state code as required.
        // Process the screen capture state change.
    }
    (void)userData;
}

// Obtain and process the OnBufferAvailable() callback function of the original audio and video stream data.
void OnBufferAvailable(OH_AVScreenCapture *capture, OH_AVBuffer *buffer, OH_AVScreenCaptureBufferType bufferType, int64_t timestamp, void *userData) {
    // Screen capture is in progress.
}
int *userData = nullptr;// User-defined data.
OH_AVScreenCapture_SetErrorCallback(capture, OnError, userData);
OH_AVScreenCapture_SetStateCallback(capture, OnStateChange, userData);
OH_AVScreenCapture_SetDataCallback(capture, OnBufferAvailable, userData);
Starting Screen Capture
After screen capture is started by calling OH_AVScreenCapture_StartScreenCapture, the system begins capturing the raw stream. Use the OH_AVScreenCapture_OnBufferAvailable callback to listen for stream generation and the OH_AVScreenCapture_OnStateChange callback to listen for state changes.
Within the callbacks, you can call OH_AVScreenCapture_AcquireAudioBuffer to obtain the audio stream and OH_AVScreenCapture_AcquireVideoBuffer to obtain the video stream.
OH_AVScreenCapture_StartScreenCapture(capture);
Processing Captured Data
Depending on the audio and video capture parameters, different data streams are generated, including video streams, internal audio streams, and microphone audio streams. You can process these according to your scenario, such as routing the streams to other modules for desktop sharing or live video streaming.
bool IsCaptureStreamRunning = true;
// Obtain and process the OnBufferAvailable() callback function of the original audio and video stream data.
void OnBufferAvailable(OH_AVScreenCapture *capture, OH_AVBuffer *buffer, OH_AVScreenCaptureBufferType bufferType, int64_t timestamp, void *userData) {
    // Screen capture is in progress.
    if (IsCaptureStreamRunning) {
        if (bufferType == OH_SCREEN_CAPTURE_BUFFERTYPE_VIDEO) {
            // Video buffer.
            OH_NativeBuffer *nativeBuffer = OH_AVBuffer_GetNativeBuffer(buffer);
            if (nativeBuffer != nullptr && capture != nullptr) {
                // Obtain the buffer capacity.
                int bufferLen = OH_AVBuffer_GetCapacity(buffer);

                // Obtain the buffer attribute.
                OH_AVCodecBufferAttr info;
                OH_AVBuffer_GetBufferAttr(buffer, &info);

                // Obtain the native buffer configuration.
                OH_NativeBuffer_Config config;
                OH_NativeBuffer_GetConfig(nativeBuffer, &config);

                // Obtain the buffer address.
                uint8_t *buf = OH_AVBuffer_GetAddr(buffer);
                if (buf == nullptr) {
                    return;
                }
                // Use the buffer data.

                // The reference count of the native buffer is decremented by 1. When the reference count reaches 0, the buffer is released.
                OH_NativeBuffer_Unreference(nativeBuffer);
            }
        } else if (bufferType == OH_SCREEN_CAPTURE_BUFFERTYPE_AUDIO_INNER) {
            // Buffer for internal recording.
            // Obtain the buffer attribute.
            OH_AVCodecBufferAttr info;
            OH_AVBuffer_GetBufferAttr(buffer, &info);

            // Obtain the buffer capacity.
            int bufferLen = OH_AVBuffer_GetCapacity(buffer);

            // Obtain the buffer address.
            uint8_t *buf = OH_AVBuffer_GetAddr(buffer);
            if (buf == nullptr) {
                return;
            }
            // Use the buffer data.
        } else if (bufferType == OH_SCREEN_CAPTURE_BUFFERTYPE_AUDIO_MIC) {
            // Microphone buffer.
            // Obtain the buffer capacity.
            int bufferLen = OH_AVBuffer_GetCapacity(buffer);

            // Obtain the buffer address.
            uint8_t *buf = OH_AVBuffer_GetAddr(buffer);
            if (buf == nullptr) {
                return;
            }
            // Use the buffer data.
        }
    }
}
Stopping Screen Capture
Call OH_AVScreenCapture_StopScreenCapture to stop screen capture or sharing and release the microphone.
// Stop screen capture.
OH_AVScreenCapture_StopScreenCapture(capture);
Releasing Resources
Call OH_AVScreenCapture_Release to release the created OH_AVScreenCapture instance. This must be done after screen capture is stopped.
// Release screen capture resources.
OH_AVScreenCapture_Release(capture);
PC/2-in-1 Pop-up Mode Configuration
The system provides the following screen capture modes: Capturing a Specified Screen, Capturing the Main Screen, and Capturing a Specified Window.
The screen capture mode uses the display ID (displayId) and window ID (missionIds). For details about how to obtain the display ID and window ID, see Obtaining displayId and Obtaining missionIds.
Capturing a Specified Screen
This is the OH_CAPTURE_SPECIFIED_SCREEN mode.
In this mode, after screen capture starts, the PC/2-in-1 device displays a pop-up for selecting the content to share. By default, the screen corresponding to the videoCapInfo.displayId parameter is selected. If the window corresponding to the provided displayId does not exist, no selection is made.
// Configure the screen capture width and height in config based on the PC's or 2-in-1 device's resolution.
config.videoInfo.videoCapInfo.videoFrameWidth = 2880;
config.videoInfo.videoCapInfo.videoFrameHeight = 1920;

// Set the screen capture mode to OH_CAPTURE_SPECIFIED_SCREEN and pass a display ID.
config.captureMode = OH_CAPTURE_SPECIFIED_SCREEN;
config.videoInfo.videoCapInfo.displayId = 0;
Capturing the Main Screen
This is the OH_CAPTURE_HOME_SCREEN mode.
In this mode, after screen capture starts, the PC/2-in-1 device does not display a pop-up for selecting the content to share. Instead, it displays a privacy protection pop-up. The configured videoCapInfo.displayId parameter does not take effect, and the display ID of the main screen is used by default.
// Configure the screen capture width and height in config based on the PC's or 2-in-1 device's resolution.
config.videoInfo.videoCapInfo.videoFrameWidth = 2880;
config.videoInfo.videoCapInfo.videoFrameHeight = 1920;

// Set the screen capture mode to OH_CAPTURE_HOME_SCREEN and pass a display ID.
config.captureMode = OH_CAPTURE_HOME_SCREEN;
Capturing a Specified Window (Recommended)
This is the OH_CAPTURE_SPECIFIED_WINDOW mode.
The application should configure the screen capture height and width values according to the PC/2-in-1 device resolution and pass the display ID.
To capture a specific window, the target window ID must be set. In this scenario, after screen capture starts, the PC/2-in-1 device displays a pop-up for selecting the content to share, and the specified window is selected by default.
// Configure the screen capture width and height in config based on the PC's or 2-in-1 device's resolution.
config.videoInfo.videoCapInfo.videoFrameWidth = 2880;
config.videoInfo.videoCapInfo.videoFrameHeight = 1920;

// Set the screen capture mode to OH_CAPTURE_SPECIFIED_WINDOW and pass a display ID.
config.captureMode = OH_CAPTURE_SPECIFIED_WINDOW;
config.videoInfo.videoCapInfo.displayId = 0;

// (Optional) Pass a window ID if you want to capture a specific window.
std::vector<int32_t> missionIds = {61}; // Window 61 is selected in the picker by default.
config.videoInfo.videoCapInfo.missionIDs = &missionIds[0];
config.videoInfo.videoCapInfo.missionIDsLen = static_cast<int32_t>(missionIds.size());
To capture multiple windows simultaneously, pass a list of the desired window IDs. In this scenario, the PC/2-in-1 device does not display a pop-up for selecting the content to share. Instead, it displays the privacy protection pop-up.
// Configure the screen capture width and height in config based on the PC's or 2-in-1 device's resolution.
config.videoInfo.videoCapInfo.videoFrameWidth = 2880;
config.videoInfo.videoCapInfo.videoFrameHeight = 1920;

// Set the screen capture mode to OH_CAPTURE_SPECIFIED_WINDOW and pass a display ID.
config.captureMode = OH_CAPTURE_SPECIFIED_WINDOW;
config.videoInfo.videoCapInfo.displayId = 0;

// Pass multiple window IDs.
vector<int32_t> missionIds = {60, 61}; // Windows 60 and 61 are to be captured simultaneously.
config.videoInfo.videoCapInfo.missionIDs = &missionIds[0];
config.videoInfo.videoCapInfo.missionIDsLen = static_cast<int32_t>(missionIds.size());
Additional Resources
-
API reference: For details, see native_avscreen_capture.h.
-
Sample project: This sample demonstrates screen capture using the AVScreenCapture component APIs. For details, see Screen Capture.
你可能感兴趣的鸿蒙文章
openharmony 鸿蒙 using-ndk-avplayer-for-playback
openharmony 鸿蒙 media-kit-intro
openharmony 鸿蒙 avtranscoder-faq
openharmony 鸿蒙 video-recording
openharmony 鸿蒙 avscreencapture-c-custom-scenarios
openharmony 鸿蒙 streaming-media-playback-development-guide
openharmony 鸿蒙 using-ndk-avrecorder-for-audio-recording