@Provider and @Consumer Decorators: Synchronizing Across Component Levels in a Two-Way Manner
@Provider and @Consumer are used for synchronizing data across the component levels in a two-way manner, so that you are free from the constraints of the component levels.
@Provider and @Consumer are decorators in state management V2, so they can be used only in @ComponentV2. A compilation error will be reported if they are used in @Component.
@Provider and @Consumer provide the capability of synchronizing data across the component levels in a two-way manner. Before reading this document, you are advised to read @ComponentV2. For details about common problems, see In-Component State Management FAQs.
NOTE
@Provider and @Consumer decorators are supported since API version 12.
@Provider and @Consumer decorators can be used in atomic services since API version 12.
Since API version 22, you can set the BuildOptions parameter enableProvideConsumeCrossing to true in BuilderNode to enable cross-BuilderNode two-way synchronization for @Provider and @Consumer. After BuilderNode is mounted to the custom component node tree, @Consumer re-obtains the latest @Provider data and establishes a two-way synchronization relationship with it. For details, see Using @Consumer to Establish Two-Way Synchronization with @Provider in the Cross-BuilderNode Scenario.
@Provider and @Consumer decorators can be used in ArkTS cards since API version 23.
Overview
@Provider provides data. Its child components can use the @Consumer to obtain the data by binding the same key.
@Consumer obtains data. It can obtain the @Provider data of the nearest parent node by binding the same key. If the @Provider data cannot be found, the local default value will be used. For details, see the following.
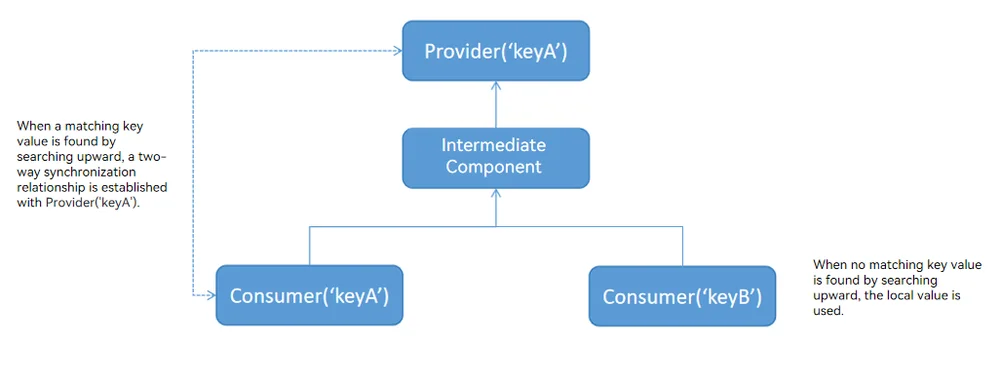
Data types decorated by @Provider and @Consumer must be the same.
The following notes must be paid attention to when using @Provider and @Consumer:
- @Provider and @Consumer strongly depend on the custom component levels. @Consumer is initialized to different values because the parent component of the custom component is different.
- Using @Provider with @Consumer is equivalent to bonding components together. From the perspective of independent component, usage of @Provider and @Consumer should be lessened.
Capability Comparison: @Provider and @Consumer Vs. @Provide and @Consume
In state management V1, @Provide and @Consume are the decorators which provide two-way synchronization across component levels. This topic introduces @Provider and @Consumer decorators in state management V2. Although the names and features of the two pairs are similar, there are still some differences.
If you are not familiar with @Provide and @Consume in state management V1, you can skip this section.
| Capability | @Provider and @Consumer Decorators of V2 | @Provide and @Consume Decorators of V1 |
|---|---|---|
| @Consume(r) | Local initialization is mandatory. The local default value will be used when @Provider is not found. | Before API version 20, @Consume does not support local initialization. If the corresponding @Provide cannot be found, an exception is thrown. From API version 20 onwards, @Consume supports setting the default value. If the default value is not set and the corresponding @Provide cannot be found, an exception is thrown. |
| Supported Type | function is supported. | function is not supported. |
| Observation capability | Only the value change of itself can be observed. To observe the nesting scenario, use this decorator together with @Trace. | Changes at the first layer can be observed. To observe the nesting scenario, use this decorator together with @Observed and @ObjectLink. |
| alias and attribute name | alias is the unique matching key. By default, the attribute name is alias. | If both the alias and attribute name are key, the former one is matched first. If no match is found, the attribute name can be matched. |
| @Provide(r) initialization from the parent component | Not allowed. | Allowed. |
| @Provide(r) overloading support | Enabled by default. That is, @Provider can have duplicate names and @Consumer can search upwards for the nearest @Provider. | Disabled by default. That is, @Provide with duplicate names is not allowed in the component tree. If overloading is required, set allowOverride. |
Decorator Description
Basic rules
@Provider syntax:
@Provider(aliasName?: string) varName : varType = initValue
| @Provider Property Decorator | Description |
|---|---|
| Parameters | aliasName?: string: alias. The default value is the attribute name. |
| Supported Type | Member variables in the custom component. Property types include number, string, boolean, class, Array, Date, Map, and Set. Arrow functions. |
| Initialization from the parent component | Forbidden. |
| Local initialization | Required. |
| Observation capability | Be equivalent to @Trace. Changes are synchronized to the corresponding @Consumer. |
@Consumer syntax:
@Consumer(aliasName?: string) varName : varType = initValue
| @Consumer Property Decorator | Description |
|---|---|
| Parameters | aliasName?: string: alias. The default value is the attribute name. The nearest @Provider is searched upwards. |
| Supported type | Member variables in the custom component. Property types include number, string, boolean, class, Array, Date, Map, and Set. Arrow function. |
| Initialization from the parent component | Forbidden. |
| Local initialization | Required. |
| Observation capability | Be equivalent to @Trace. Changes will be synchronized to the corresponding @Provider. |
aliasName and Attribute Name
@Provider and @Consumer accept the optional parameter aliasName. If no parameter is set, the attribute name is used as the default aliasName.
NOTE
aliasName is the unique key used to match @Provider and @Consumer.
The following three examples clearly describe how @Provider and @Consumer use aliasName for searching and matching.
@ComponentV2
struct Parent {
  // The aliasName is not defined. Use the property name "str" as the aliasName.
  @Provider() str: string = 'hello';
}

@ComponentV2
struct Child {
  // Define aliasName as"str" and use it to search.
  // If the value can be found on the Parent component, use the value "hello" of @Provider.
  @Consumer('str') str: string = 'world';
}
@ComponentV2
struct Parent {
  // Define aliasName as "alias".
  @Provider('alias') str: string = 'hello';
}

@ComponentV2
struct Child {
  // Define aliasName as "alias", find out @Provider, and obtain the value "hello".
  @Consumer('alias') str: string = 'world';
}
@ComponentV2
struct Parent {
  // Define aliasName as "alias".
  @Provider('alias') str: string = 'hello';
}

@ComponentV2
struct Child {
  // The aliasName is not defined. Use the property name "str" as the aliasName.
  // The corresponding @Provider is not found, use the local value "world".
  @Consumer() str: string = 'world';
}
Variable Passing
| Behavior | Description |
|---|---|
| Initialization from the parent component | Variables decorated by @Provider and @Consumer can be initialized only locally. |
| Child component initialization | Variables decorated by @Provider and @Consumer can be used to initialize @Param decorated variables in the child component. |
Constraints
- @Provider and @Consumer are attribute decorators of custom components. They can decorate only attributes in custom components but not class attributes.
- @Provider and @Consumer are decorators of the state management V2, which can be used only in @ComponentV2 but not in @Component.
- @Provider and @Consumer support only local initialization.
Use Cases
Synchronizing @Provider and @Consumer in a Two-Way Manner
Establishing a Two-Way Binding
- Initialize the Parent and Child custom components:
- @Consumer() str: string = 'world' in the Child component searches upwards to find @Provider() str: string = 'hello' in the Parent component.
- @Consumer() str: string = 'world' is initialized to the value of @Provider, that is, 'hello'.
- Both of them establish a two-way synchronization relationship.
- Click the button in Parent, change the str decorated by @Provider, and notify the corresponding @Consumer to refresh the UI.
- Click the button in Child, change the str decorated by @Consumer, and notify the corresponding @Provider to refresh the UI.
@Entry
@ComponentV2
struct Parent {
  @Provider() str: string = 'hello';

  build() {
    Column() {
      Button(this.str)
        .onClick(() => {
          this.str += '0';
        })
      Child()
    }
  }
}

@ComponentV2
struct Child {
  // The name of the @Consumer decorated attribute str is the same as that of the @Provider decorated attribute str in the Parent component. Therefore, a bidirectional binding relationship is established.
  @Consumer() str: string = 'world';

  build() {
    Column() {
      Button(this.str)
        .onClick(() => {
          this.str += '0';
        })
    }
  }
}
Establishing a Two-Way Binding Failed
In the following example, @Provider and @Consumer fail to establish a two-way synchronization relationship because of different aliasName value.
- Initialize the Parent and Child custom components:
- @Provider is not found when @Consumer() str: string = 'world' in the Child component searches upwards.
- @Consumer() str: string = 'world' uses the local default value 'world'.
- Both of them fail to establish a two-way synchronization relationship.
- Click the button in the Parent component to change @Provider decorated str1 and re-render only the Button component associated with @Provider.
- Click the button in Child to change the str decorated by @Consumer. Only the Button component associated with @Consumer is updated.
@Entry
@ComponentV2
struct Parent {
  @Provider() str1: string = 'hello';

  build() {
    Column() {
      Button(this.str1)
        .onClick(() => {
          this.str1 += '0';
        })
      Child()
    }
  }
}

@ComponentV2
struct Child {
  // The name of the @Consumer decorated attribute str is different from that of the @Provider decorated attribute str1 in the Parent component. Therefore, the bidirectional binding relationship cannot be established.
  @Consumer() str: string = 'world';

  build() {
    Column() {
      Button(this.str)
        .onClick(() => {
          this.str += '0';
        })
    }
  }
}
Decorating Variables of the Array Type
When the decorated object is of the Array type, the following can be observed: (1) complete array reassignment; (2) array item changes caused by calling push, pop, shift, unshift, splice, copyWithin, fill, reverse, or sort.
@Entry
@ComponentV2
struct Parent {
  @Provider() count: number[] = [1, 2, 3];

  build() {
    Row() {
      Column() {
        ForEach(this.count, (item: number) => {
          Text(`parent: ${item}`).fontSize(30)
          Divider()
        })
        Button('push').onClick(() => {
          this.count.push(111);
        })
        Button('reverse').onClick(() => {
          this.count.reverse();
        })
        Button('fill').onClick(() => {
          this.count.fill(6);
        })
        Child()
      }
      .width('100%')
    }
    .height('100%')
  }
}

@ComponentV2
struct Child {
  @Consumer() count: number[] = [9, 8, 7];

  build() {
    Column() {
      ForEach(this.count, (item: number) => {
        Text(`child: ${item}`).fontSize(30)
        Divider()
      })
      Button('push').onClick(() => {
        this.count.push(222);
      })
      Button('reverse').onClick(() => {
        this.count.reverse();
      })
      Button('fill').onClick(() => {
        this.count.fill(8);
      })
    }
    .width('100%')
  }
}
Decorating Variables of the Date Type
By decorating the variables of the Date type, you can observe the value changes to the entire Date and the changes brought by calling the Date APIs: setFullYear, setMonth, setDate, setHours, setMinutes, setSeconds, setMilliseconds, setTime, setUTCFullYear, setUTCMonth, setUTCDate, setUTCHours, setUTCMinutes, setUTCSeconds, and setUTCMilliseconds.
@Entry
@ComponentV2
struct Parent {
  @Provider() selectedDate: Date = new Date('2021-08-08');

  build() {
    Column() {
      Text(`parent: ${this.selectedDate}`)
      Button('update the new date')
        .onClick(() => {
          this.selectedDate = new Date('2023-07-07');
        })
      Button('increase the year by 1')
        .onClick(() => {
          this.selectedDate.setFullYear(this.selectedDate.getFullYear() + 1);
        })
      Button('increase the month by 1')
        .onClick(() => {
          this.selectedDate.setMonth(this.selectedDate.getMonth() + 1);
        })
      Button('increase the day by 1')
        .onClick(() => {
          this.selectedDate.setDate(this.selectedDate.getDate() + 1);
        })
      Child()
    }
  }
}

@ComponentV2
struct Child {
  @Consumer() selectedDate: Date = new Date('2022-07-07');

  build() {
    Column() {
      Text(`child: ${this.selectedDate}`)
      Button('update the new date')
        .onClick(() => {
          this.selectedDate = new Date('2025-01-01');
        })
      Button('increase the year by 1')
        .onClick(() => {
          this.selectedDate.setFullYear(this.selectedDate.getFullYear() + 1);
        })
      Button('increase the month by 1')
        .onClick(() => {
          this.selectedDate.setMonth(this.selectedDate.getMonth() + 1);
        })
      Button('increase the day by 1')
        .onClick(() => {
          this.selectedDate.setDate(this.selectedDate.getDate() + 1);
        })
    }
  }
}
Decorating Variables of the Map Type
By decorating the variables of the Map type, you can observe the overall value changes to the entire Map and the changes brought by calling the Map APIs: set, clear, and delete.
@Entry
@ComponentV2
struct Parent {
  @Provider() message: Map<number, string> = new Map([[0, 'a'], [1, 'b'], [3, 'c']]);

  build() {
    Column() {
      Text('Parent').fontSize(30)
      ForEach(Array.from(this.message.entries()), (item: [number, string]) => {
        Text(`${item[0]}`).fontSize(30)
        Text(`${item[1]}`).fontSize(30)
        Divider()
      })
      Button('init map').onClick(() => {
        this.message = new Map([[0, 'aa'], [1, 'bb'], [3, 'cc']]);
      })
      Button('set new one').onClick(() => {
        this.message.set(4, 'd');
      })
      Button('clear').onClick(() => {
        this.message.clear();
      })
      Button('replace the first one').onClick(() => {
        this.message.set(0, 'a~');
      })
      Button('delete the first one').onClick(() => {
        this.message.delete(0);
      })
      Child()
    }
  }
}

@ComponentV2
struct Child {
  @Consumer() message: Map<number, string> = new Map([[0, 'd'], [1, 'e'], [3, 'f']]);

  build() {
    Column() {
      Text('Child').fontSize(30)
      ForEach(Array.from(this.message.entries()), (item: [number, string]) => {
        Text(`${item[0]}`).fontSize(30)
        Text(`${item[1]}`).fontSize(30)
        Divider()
      })
      Button('init map').onClick(() => {
        this.message = new Map([[0, 'dd'], [1, 'ee'], [3, 'ff']]);
      })
      Button('set new one').onClick(() => {
        this.message.set(4, 'g');
      })
      Button('clear').onClick(() => {
        this.message.clear();
      })
      Button('replace the first one').onClick(() => {
        this.message.set(0, 'a*');
      })
      Button('delete the first one').onClick(() => {
        this.message.delete(0);
      })
    }
  }
}
Decorating Variables of the Set Type
By decorating the variables of the Set type, you can observe the overall value changes to the entire Set and the changes brought by calling the Set APIs: add, clear, and delete.
@Entry
@ComponentV2
struct Parent {
  @Provider() message: Set<number> = new Set([1, 2, 3, 4]);

  build() {
    Column() {
      Text('Parent').fontSize(30)
      ForEach(Array.from(this.message.entries()), (item: [number, number]) => {
        Text(`${item[0]}`).fontSize(30)
        Divider()
      })
      Button('init set').onClick(() => {
        this.message = new Set([1, 2, 3, 4]);
      })
      Button('set new one').onClick(() => {
        this.message.add(5);
      })
      Button('clear').onClick(() => {
        this.message.clear();
      })
      Button('delete the first one').onClick(() => {
        this.message.delete(1);
      })
      Child()
    }
  }
}

@ComponentV2
struct Child {
  @Consumer() message: Set<number> = new Set([1, 2, 3, 4, 5, 6]);

  build() {
    Column() {
      Text('Child').fontSize(30)
      ForEach(Array.from(this.message.entries()), (item: [number, number]) => {
        Text(`${item[0]}`).fontSize(30)
        Divider()
      })
      Button('init set').onClick(() => {
        this.message = new Set([1, 2, 3, 4, 5, 6]);
      })
      Button('set new one').onClick(() => {
        this.message.add(7);
      })
      Button('clear').onClick(() => {
        this.message.clear();
      })
      Button('delete the first one').onClick(() => {
        this.message.delete(1);
      })
    }
  }
}
Decorating Callback by Using @Provider and @Consumer and Facilitating Behavior Abstraction Between Components
When a parent component needs to register callbacks for child components, the @Provider and @Consumer decorators can be applied to callback methods.
For drag scenarios requiring synchronization of child component drag start position to the parent component, refer to the following example.
@Entry
@ComponentV2
struct Parent {
  @Local childX: number = 0;
  @Local childY: number = 1;
  @Provider() onDrag: (x: number, y: number) => void = (x: number, y: number) => {
    console.info(`onDrag event at x=${x} y:${y}`);
    this.childX = x;
    this.childY = y;
  }

  build() {
    Column() {
      Text(`child position x: ${this.childX}, y: ${this.childY}`)
      Child()
    }
  }
}

@ComponentV2
struct Child {
  @Consumer() onDrag: (x: number, y: number) => void = (x: number, y: number) => {};

  build() {
    Button('changed')
      .draggable(true)
      .onDragStart((event: DragEvent) => {
        // Current Previewer does not support common drag events.
        this.onDrag(event.getDisplayX(), event.getDisplayY());
      })
  }
}
Decorating Complex Types by @Provider and @Consumer and Using together with @Trace
- @Provider and @Consumer can only observe the changes of the data. If you need to observe the attribute changes of the decorated complex data type, you must use @Trace together.
- When decorating built-in types, such as Array, Map, Set, and Date, you can observe the changes of some APIs. The observation capability is the same as that of @Trace.
@ObservedV2
class User {
  @Trace public name: string;
  @Trace public age: number;

  constructor(name: string, age: number) {
    this.name = name;
    this.age = age;
  }
}
const data: User[] = [new User('Json', 10), new User('Eric', 15)];
@Entry
@ComponentV2
struct Parent {
  @Provider('data') users: User[] = data;

  build() {
    Column() {
      Child()
      Button('add new user')
        .onClick(() => {
          this.users.push(new User('Molly', 18));
        })
      Button('age++')
        .onClick(() => {
          this.users[0].age++;
        })
      Button('change name')
        .onClick(() => {
          this.users[0].name = 'Shelly';
        })
    }
  }
}

@ComponentV2
struct Child {
  @Consumer('data') users: User[] = [];

  build() {
    Column() {
      ForEach(this.users, (item: User) => {
        Column() {
          Text(`name: ${item.name}`).fontSize(30)
          Text(`age: ${item.age}`).fontSize(30)
          Divider()
        }
      })
    }
  }
}
Searching Upwards by @Consumer for the Nearest @Provider
If @Provider has duplicate names in the component tree, @Consumer will search upwards for the @Provider data of the nearest parent node.
@Entry
@ComponentV2
struct Index {
  @Provider() val: number = 10;

  build() {
    Column() {
      Parent()
    }
  }
}

@ComponentV2
struct Parent {
  @Provider() val: number = 20;
  @Consumer('val') val2: number = 0; // 10

  build() {
    Column() {
      Text(`${this.val2}`)
      Child()
    }
  }
}

@ComponentV2
struct Child {
  @Consumer() val: number = 0; // 20

  build() {
    Column() {
      Text(`${this.val}`)
    }
  }
}
In the preceding example:
- @Consumer in Parent searches upwards for @Provider() val: number = 10 defined in Index and initializes it to 10.
- @Consumer in Child is searched upwards. After @Provider() val: number = 20 defined in Parent is found, @Consumer stops and is initialized to 20.
Initializing @Param by @Provider and @Consumer
Variables decorated by @Provider and @Consumer can be used to initialize @Param decorated variables in the child component.
@Entry
@ComponentV2
struct Index {
  @Provider() val: number = 10;

  build() {
    Column() {
      Text(`Index @Provider val: ${this.val}`).fontSize(30)
      Parent({ val2: this.val })
    }
  }
}

@ComponentV2
struct Parent {
  @Consumer() val: number = 0;
  @Require @Param val2: number;

  build() {
    Column() {
      Text(`Parent @Consumer val: ${this.val}`).fontSize(30)
      Button('change val').onClick(() => {
        this.val++;
      })
      Text(`Parent @Param val2: ${this.val2}`).fontSize(30)
      Child({ val: this.val })
    }.border({ width: 2, color: Color.Green })
  }
}

@ComponentV2
struct Child {
  @Require @Param val: number;

  build() {
    Column() {
      Text(`Child @Param val ${this.val}`).fontSize(30)
    }.border({ width: 2, color: Color.Pink })
  }
}
In the preceding example:
- Two-way data binding is established between the variable val decorated by @Provider in Index and the variable val decorated by @Consumer in Parent. The variable val2 decorated by @Param in Parent receives data from the data source val in Index and synchronizes the changes. The variable val decorated by @Param in Child receives data from the data source val in Parent and synchronizes the changes.
- Click the button in Parent to trigger the change of @Consumer() val. The change is synchronized to @Provider() val in Index and @Param val in Child, and the corresponding UI is refreshed.
- The change of @Provider() val in the Index is synchronized to @Param val2 in the parent, which corresponds to UI update.
Using @Consumer to Establish Two-Way Synchronization with @Provider in the Cross-BuilderNode Scenario
NOTE
Since API version 22, cross-BuilderNode pairing of @Provider and @Consumer is supported.
The following provides an example to implement the following functions:
- BuilderNode constructs the component tree through a global custom builder function. The root FrameNode of the component tree can be obtained via getFrameNode, and this node can be directly returned by NodeController and mounted under the NodeContainer node.
- When mounting to the custom component node tree, BuilderNode is mounted under the custom component via the addBuilderNode method. At this point, the @Consumer under the BuilderNode searches upward for @Provider; after finding the nearest @Provider according to the key matching rules, it establishes a two-way synchronization relationship with the @Provider. If no matched @Provider is found, the default value of @Consumer is used.
- After a two-way synchronization relationship is established, if the value of the variable decorated by @Provider is different from the default value of @Consumer, the framework will trigger a callback for the @Monitor method of @Consumer, as well as the @Monitor methods of variables that have a synchronization relationship with @Consumer. For example: @Consumer notifies the @Param in its child components to trigger the @Monitor method.
- After BuilderNode is unmounted from the component tree, @Consumer attempts to find the corresponding @Provider again. If it finds that the previously paired @Provider can no longer be located after being unmounted from the component tree, it disconnects the two-way synchronization relationship with the @Provider, and the variable decorated by @Consumer is restored to its default value.
- When @Consumer disconnects the connection with @Provider and reverts to its default value, it determines whether the value of the variable decorated by @Consumer has changed relative to the shift from the @Provider value to the @Consumer default value. If there is a change, it triggers a callback for the @Monitor method of @Consumer, as well as the @Monitor methods of variables that have a synchronization relationship with this @Consumer.
import { BuilderNode, FrameNode, NodeController } from '@kit.ArkUI';

@Builder
function buildText() {
  TestRemove()
}

let globalBuilderNode: BuilderNode<[]>|null = null;

class TextNodeController extends NodeController {
  private rootNode: FrameNode|null = null;
  private uiContext: UIContext|null = null;

  constructor() {
    super();
  }

  makeNode(context: UIContext): FrameNode|null {
    this.rootNode = new FrameNode(context);
    this.uiContext = context;
    return this.rootNode;
  }

  addBuilderNode(): void {
    if (globalBuilderNode === null && this.uiContext) {
      globalBuilderNode = new BuilderNode(this.uiContext);
      // Construct BuilderNode, with TestRemove as a child component.
      globalBuilderNode.build(wrapBuilder<[]>(buildText), undefined, { enableProvideConsumeCrossing: true });
    }
    if (this.rootNode && globalBuilderNode) {
      this.rootNode.appendChild(globalBuilderNode.getFrameNode());
    }
  }

  removeBuilderNode(): void {
    if (this.rootNode && globalBuilderNode) {
      this.rootNode.removeChild(globalBuilderNode.getFrameNode());
    }
  }

  disposeNode(): void {
    if (this.rootNode && globalBuilderNode) {
      globalBuilderNode.dispose();
    }
  }
}

@Entry
@ComponentV2
struct RemoChildDisconnectProvider {
  @Provider() content: string = 'Index: hello world';
  @Monitor('content')
  providerWatch() {
    console.info(`Provider change ${this.content}`);
  }

  controllerIndex: TextNodeController = new TextNodeController();

  build() {
    Column({ space: 8 }) {
      Text(`Provider: ${this.content}`)

      // Add BuilderNode, @Consumer establishes two-way synchronization with @Provider.
      Button('add child')
        .onClick(() => {
          this.controllerIndex.addBuilderNode();
        })

      // Remove BuilderNode, @Consumer disconnects the connection with @Provider and reverts to the default value.
      Button('remove child')
        .onClick(() => {
          this.controllerIndex.removeBuilderNode();
        })

      // The child node TestRemove of BuilderNode is released. Subsequently, this child node is destroyed, which triggers the aboutToDisappear callback of the child node.
      Button('dispose child')
        .onClick(() => {
          this.controllerIndex.disposeNode();
        })

      // Two-way synchronous update of @Provider/@Consumer
      Button('change Provider')
        .onClick(() => {
          this.content += 'Pro';
        })
      NodeContainer(this.controllerIndex)
    }
    .width('100%')
    .height('100%')
  }
}

@ComponentV2
struct TestRemove {
  @Consumer() content: string = 'default value';
  @Monitor('content')
  consumerWatch() {
    console.info(`Consumer change ${this.content}`);
  }

  aboutToDisappear() {
    console.info(`TestRemove aboutToDisappear`);
  }

  build() {
    Column() {
      Text('Consumer ' + this.content)

      // The Text component bound to @Provider and @Consumer is refreshed, and the @Monitor methods of @Provider and @Consumer are triggered.
      Button('change cc')
        .onClick(() => {
          this.content += 'cc';
        })
    }
  }
}
In the preceding example:
- When add Child is clicked, the @Consumer in TestRemove finds the nearest @Provider in RemoChildDisconnectProvider upward, updates the @Consumer from the default value to the value of the @Provider, and triggers the @Monitor method of the @Consumer.
- After @Provider and @Consumer are paired, a two-way synchronization relationship is established. When change Provider and Text(change cc) is clicked, the Text components bound to @Provider and @Consumer refresh, and the @Monitor methods of @Provider and @Consumer are triggered.
- When remove Child is clicked, the child node of BuilderNode is unmounted from the component tree; the @Consumer in TestRemove disconnects the connection with the @Provider in RemoChildDisconnectProvider, the @Consumer in TestRemove reverts to its default value, and the @Monitor method of the @Consumer is triggered.
- When dispose Child is clicked, the child node TestRemove under BuilderNode is released. Subsequently, this child node is destroyed, and the aboutToDisappear callback is executed.
你可能感兴趣的鸿蒙文章
openharmony 鸿蒙 arkts-new-makeObserved
openharmony 鸿蒙 arkts-new-param
openharmony 鸿蒙 arkts-state-management-introduce
openharmony 鸿蒙 properly-use-state-management-to-develope
openharmony 鸿蒙 arkts-new-persistencev2
openharmony 鸿蒙 arkts-v1-v2-migration-application
openharmony 鸿蒙 arkts-v1-v2-migration-reusable
openharmony 鸿蒙 arkts-page-custom-components-lifecycle