开源鸿蒙 Building Mini and Small Systems
Building Mini and Small Systems
Overview
The Compilation and Building subsystem provides a build framework based on Generate Ninja (GN) and Ninja. This subsystem allows you to:
Assemble components into a product and build the product.
Build chipset source code independently.
Build a single component independently.
Basic Concepts
Learn the following basic concepts before you start:
- Subsystem
A subsystem, as a logical concept, consists of one or more components. OpenHarmony is designed with a layered architecture, which consists of the kernel layer, system service layer, framework layer, and application layer from the bottom up. System functions are developed by levels, from system to subsystem and then to component. In a multi-device deployment scenario, you can customize subsystems and components as required. - Component
A component is a reusable, configurable, and tailorable function unit. Each component has an independent directory, and can be built and tested independently and developed concurrently. - GN
GN is short for Generate Ninja. It is used to build Ninja files. - Ninja
Ninja is a small high-speed building system. - hb
hb is an OpenHarmony command line tool used to execute build commands.
Directory Structure
build/lite
├── components                  # Component description file
├── figures                     # Figures in the readme file
├── hb                          # hb pip installation package
├── make_rootfs                 # Script used to create a file system image
├── config                      # Build configurations
│   ├── component               # Component-related template definition
│   ├── kernel                  # Kernel-related build configuration
│   └── subsystem               # Subsystem build configuration
├── platform                    # ld script
├── testfwk                     # Test build framework
└── toolchain                   # Build toolchain configuration, which contains the compiler directories, build options, and linking options
Build Process
The figure below shows the build process.
Figure 1 Build process
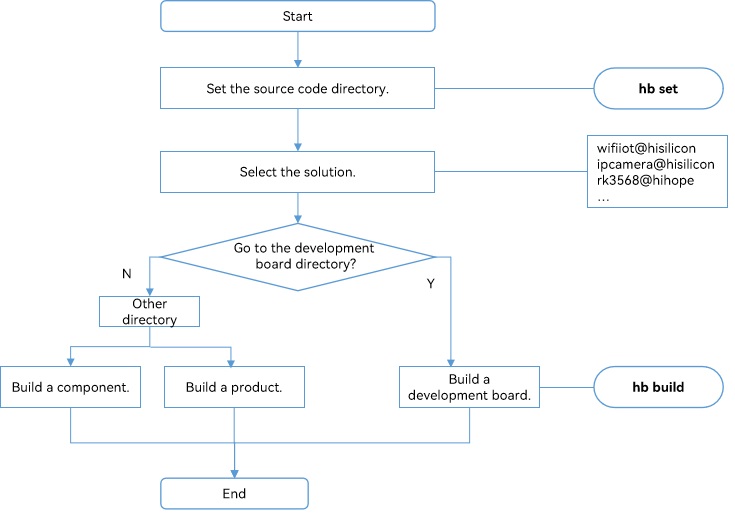
Use hb set to set the OpenHarmony source code directory and the product to build.
Use hb build to build the product, development board, or component.
The procedure is as follows:
(1) Read the config.gni file of the development board selected. The file contains the build toolchain, linking commands, and build options.
(2) Run the gn gen command to read the product configuration and generate the out directory and ninja files for the solution.
(3) Run ninja -C out/board/product to start the build.
(4) Package the files built, set file attributes and permissions, and create a file system image.
Configuration Rules
You can build a component, a chipset solution, and a product solution. To ensure that the chipset and product solutions are decoupled from OpenHarmony, follow the rules below:
Component
The component source code directory is named in the {Domain}/{Subsystem}/{Component} format. The component directory structure is as follows:
CAUTION
The .json file of the subsystem in the build/lite/components directory contains component attributes, including the name, source code directory, function description, mandatory or not, build targets, RAM, ROM, build outputs, adapted kernels, configurable features, and dependencies of the component. When adding a component, add the component information in the .json file of the corresponding subsystem. The component configured for a product must have been defined in a subsystem. Otherwise, the verification will fail.
component
├── interfaces
│   ├── innerkits  # APIs exposed internally among components
│   └── kits       # APIs provided for application developers
├── frameworks     # Framework implementation
├── services       # Service implementation
├── BUILD.gn       # Build script
The following example shows how to configure attributes of the sensor service component of the pan-sensor subsystem:
 {
     "name": "@ohos/sensor_lite",		             # OpenHarmony Package Manager (HPM) component name, in the "@Organization/Component name" format.
     "description": "Sensor services",		         # Description of the component functions.
     "version": "3.1",                                # Version, which must be the same as the version of OpenHarmony.
     "license": "MIT",			                     # Component license.
     "publishAs": "code-segment",		             # Mode for publishing the HPM package. The default value is code-segment.
     "segment": {
         "destPath": ""
     },					                             # Code restoration path (source code path) set when "publishAs" is code-segment.
     "dirs": {"base/sensors/sensor_lite"},	         # Directory structure of the HPM package. This field is mandatory and can be left empty.
     "scripts": {},			                         # Scripts to be executed. This field is mandatory and can be left empty.
     "licensePath": "COPYING",
     "readmePath": {
         "en": "README.rst"
     },
     "component": {			                         # Component attributes.
         "name": "sensor_lite",			             # Component name.
         "subsystem": "", 		                     # Subsystem to which the component belongs.
         "syscap": [], 				                 # System capabilities provided by the component for applications.
         "features": [],                              # List of external configurable features of a component. Generally, this parameter corresponds to sub_component in build and can be configured by the product.
         "adapted_system_type": [],		             # Types of adapted systems. The value can be mini, small, and standard.
         "rom": "92KB",                               # Component ROM size.
         "ram": "~200KB",,                            # Component RAM size.
         "deps": {
         "components": [                              # Other components on which this component depends.
           "samgr_lite"
         ],
         "third_party": [                             # Third-party open-source software on which this component depends.
           "bounds_checking_function"
         ]
       }
         "build": {				                     # Build-related configuration.
             "sub_component": [
                 ""//base/sensors/sensor_lite/services:sensor_service"", # Component build entry
             ],			                              # Component build entry. Configure modules here.
             "inner_kits": [],						  # APIs between components.
             "test": [] 							  # Entry for building the component's test cases.
         }
     }
  }
Observe the following rules when writing the component’s BUILD.gn:
The build target name must be the same as the component name.
Define the configurable features in the BUILD.gn file of the component. Name the configurable features in the ohos_{subsystem}{component}{feature} format. Define the features in component description and configure them in the config.json file.
Define macros in the OHOS_{SUBSYSTEM}{COMPONENT}{FEATURE} format.
NOTE
The component build script is written in GN. For details about how to use GN, see GN Quick Start Guide. The component is the build target, which can be a static library, a dynamic library, an executable file, or a group.
The following example shows the foundation/graphic/ui/BUILD.gn file for a graphics UI component:
    # Declare the configurable features of the component.
    declare_args() {
      enable_ohos_graphic_ui_animator = false # Whether to enable animation.
      ohos_ohos_graphic_ui_font = "vector"    # Configurable font type, which can be vector or bitmap.
    }

    # Basic component functions.
    shared_library("base") {
      sources = [
        ...
      ]
      include_dirs = [
        ...
      ]
    }

    # Build only when the animator is enabled.
    if(enable_ohos_graphic_ui_animator ) {
      shared_library("animator") {
        sources = [
          ...
        ]
        include_dirs = [
              ...
        ]
        deps = [ :base ]
      }
    }
    ...
    # It is recommended that the target name be the same as the name of the component, which can be an executable file (.bin), shared_library (.so file), static_library (.a file), or a group.
    executable("ui") {
      deps = [
        ":base"
      ]

      # The animator feature is configured by the product.
      if(enable_ohos_graphic_ui_animator ) {
          deps += [
            "animator"
          ]
      }
    }
Chipset Solution
The chipset solution is a special component. It is built based on a development board, including the drivers, device API adaptation, and SDK.
The source code path is named in the device/{Development board}/{Chipset solution vendor} format.
The chipset solution component is built by default based on the development board selected.
The chipset solution directory structure is as follows:
  device
  └── board                         # Chipset solution vendor
      └── company                   # Development board name
          ├── BUILD.gn              # Build script
          ├── hals                  # OS device API adaptation
          ├── linux                 # (Optional) Linux kernel version
          │   └── config.gni        # Linux build configuration
          └── liteos_a              # (Optional) LiteOS kernel version
               └── config.gni       # LiteOS_A build configuration
The config.gni file contains build-related configuration of the development board. The parameters in the file are used to build all OS components, and are globally visible to the system during the build process.
- The config.gni file contains the following key parameters:
  kernel_type:            Kernel used by the development board, for example, LiteOS_A, LiteOS_M, or Linux.
  kernel_version:         Kernel version of the development board, for example, 4.19.
  board_cpu:              CPU of the development board, for example, Cortex-A7 or RISCV32.
  board_arch:             Chipset architecture of the development board, for example, ARMv7-A or RV32IMAC.
  board_toolchain:        Name of the customized build toolchain used by the development board, for example, gcc-arm-none-eabi. If this field is not specified, ohos-clang will be used by default.
  board_toolchain_prefix: Prefix of the toolchain, for example, gcc-arm-none-eabi.
  board_toolchain_type:   Toolchain type. Currently, only GCC and clang are supported.
  board_cflags:           Build options of the .c file configured for the development board.
  board_cxx_flags:        Build options of the .cpp file configured for the development board.
  board_ld_flags:         Linking options configured for the development board.
Product Solution
The product solution is a special component. It is a product built based on a development board. It includes the OS adaptation, component assembly and configuration, startup configuration, and file system configuration. The source code directory is named in the vendor/{Product solution vendor}/{Product name} format.
The product solution directory structure is as follows:
vendor
└── company                         # Product solution vendor
    ├── product                     # Product name
    │   ├── init_configs
    │   │     ├── etc               # Startup configuration of the init process (only required for the Linux kernel)
    │   │     └── init.cfg          # System service startup configuration
    │   ├── hals                    # OS adaptation
    │   ├── BUILD.gn                # Product build script
    │   └── config.json             # Product configuration file
    │   └── fs.yml                  # File system packaging configuration
    └── ...
Follow the preceding rules to create directories and files for new products. The Compilation and Building subsystem scans the configured products based on the rules.
The key directories and files are described as follows:
- vendor/company/product/init_configs/etc
This folder contains the rcS, Sxxx, and fstab scripts. The init process runs the rcS, fstab, and S00-xxx scripts in sequence before starting system services. The Sxxx script is used to create device nodes and directories, scan device nodes, and change file permissions for the development board and product. These scripts are copied from the BUILD.gn file to the out directory of the product as required and packaged into the rootfs image.
- vendor/company/product/init_configs/init.cfg
This file is the configuration file for the init process to start services. Currently, the following commands are supported:
start: starts a service.
mkdir: creates a folder.
chmod: changes the permission on a specified directory or file.
chown: changes the owner group of a specified directory or file.
mount: mounts a device.
The fields in the file are described as follows:
   {
       "jobs" : [{                                                     # Job array. A job corresponds to a command set. Jobs are executed in the following sequence: pre-init > init > post-init.
               "name" : "pre-init",
               "cmds" : [
                   "mkdir /storage/data",                              # Create a directory.
                   "chmod 0755 /storage/data",                         #Modify the permissions. The format of the permission value is 0xxx, for example, 0755.
                   "mkdir /storage/data/log",
                   "chmod 0755 /storage/data/log",
                   "chown 4 4 /storage/data/log",                     # Change the owner group. The first number is the user ID (UID), and the second number is the group ID (GID).
                   ...
                   "mount vfat /dev/mmcblock0 /sdcard rw,umask=000"    # The command format is mount [File system type] [source] [target] [flags] [data].
                                                                       # The value of flags can be nodev, noexec, nosuid, or rdonly only.
               ]
           }, {
               "name" : "init",
               "cmds" : [                                              # Start services based on the sequence of the cmds array.
                   "start shell",                                      # There is only one space between start and the service name.
                   ...
                   "start service1"
               ]
           }, {
               "name" : "post-init",                                   # Job that is finally executed. Operations performed after the init process is started, for example, mounting a device after the driver initialization).
               "cmds" : []
           }
       ],
       "services" : [{                                                 # Service array. A service corresponds to a process.
               "name" : "shell",                                       # Service name.
               "path" : ["/sbin/getty", "-n", "-l", "/bin/sh", "-L", "115200", "ttyS000", "vt100"],    # Full path of the executable file. It must start with "path".
               "uid" : 0,                                              # Process UID, which must be the same as that in the binary file.
               "gid" : 0,                                              # Process GID, which must be the same as that in the binary file.
               "once" : 0,                                             # Whether the process is a one-off process. The value 1 indicates that process is a one-off process, and the value 0 indicates the opposite. The init process does not restart the one-off process after the process exits.
               "importance" : 0,                                       # Whether the process is a key process. The value 1 indicates a key process, and the value 0 indicates the opposite. If a key process exits, the init process will restart the board.
               "caps" : [4294967295]
           },
           ...
       ]
   }
- vendor/company/product/init_configs/hals
This file contains the OS adaptation of the product. For details about APIs for implementing OS adaptation, see the readme file of each component.
- vendor/company/product/config.json
The config.json file is the main entry for the build and contains configurations of the development board, OS, and kernel.
The following example shows the config.json file of the IP camera developed based on the hispark_taurus board:
   {
        "product_name": "ipcamera",                       # Product name
        "version": "3.0",                                 # Version of config.json. The value is 3.0.
        "type": "small",                                  # System type. The value can be mini, small, or standard.
        "ohos_version": "OpenHarmony 1.0",                # OS version
        "device_company": "hisilicon",                    # Chipset vendor
        "board": "hispark_taurus",                        # Name of the development board
        "kernel_type": "liteos_a",                        # Kernel type
        "kernel_version": "3.0.0",                        # Kernel version
        "subsystems": [
          {
            "subsystem": "aafwk",                         # Subsystem
            "components": [
              { "component": "ability", "features":[ "enable_ohos_appexecfwk_feature_ability = true" ] }   # Selected component and feature configuration
            ]
          },
          {
           ...
          }
         ...
         More subsystems and components
        }
    }
- vendor/company/product/fs.yml
This file defines the process for creating a file system image, for example, rootfs.img (user-space root file system) and userfs.img (readable and writable file). It consists of multiple lists, and each list corresponds to a file system. The fields are described as follows:
   fs_dir_name: (Mandatory) specifies name of the file system, for example, rootfs or userfs.
   fs_dirs:     (Optional) specifies the mapping between the file directory in the out directory and the system file directory. Each file directory corresponds to a list.
   source_dir:  (Optional) specifies target file directory in the out directory. If this field is not specified, an empty directory will be created in the file system based on target_dir.
   target_dir:  (Mandatory) specifies the file directory in the file system.
   ignore_files: (Optional) declares ignored files during the copy operation.
   dir_mode:    (Optional) specifies the file directory permissions. The default value is 755.
   file_mode:   (Optional) specifies the permissions of all files in the directory. The default value is 555.
   fs_filemode: (Optional) specifies the files that require special permissions. Each file corresponds to a list.
   file_dir:    (Mandatory) specifies the detailed file path in the file system.
   file_mode:   (Mandatory) declares file permissions.
   fs_symlink:  (Optional) specifies the soft link of the file system.
   fs_make_cmd: (Mandatory) creates the file system script. The script provided by the OS is located in the build/lite/make_rootfs directory. Linux, LiteOS, ext4, jffs2, and vfat are supported. Chipset vendors can also customize the script as required.
   fs_attr:     (Optional) dynamically adjusts the file system based on configuration items.
The fs_symlink and fs_make_cmd fields support the following variables:
- ${root_path}: Code root directory, which corresponds to ${ohos_root_path} of GN.
- ${out_path}: The out directory of the product, which corresponds to ${root_out_dir} of GN.
- ${fs_dir}: File system directory, which consists of variables ${root_path} and ${fs_dir_name}.
fs.yml is optional and not required for devices without a file system.
- vendor/company/product/BUILD.gn
This file provides the product built entry. It is used to build the source code of the solution vendor and copy the startup configuration file. The BUILD.gn file in the corresponding product directory will be built by default if a product is selected.
The following is an example of the BUILD.gn file of a product:
   group("product") { # The name must be the same as the product name (level-3 directory name under the product directory).
     deps = []
     # Copy the init configuration.
     deps += [ "init_configs" ]
     # Others
     ...
   }
Guidelines
Prerequisites
The development environment has GN, Ninja, Python 3.9.2 or later, and hb available. For details about the installation method, see Setting Up Environments for the Mini and Small Systems.
Using hb
hb is an OpenHarmony command line tool for executing build commands. Common hb commands are described as follows:
hb set
hb set -h
usage: hb set [-h] [-root [ROOT_PATH]] [-p]

optional arguments:
  -h, --help            show this help message and exit
  -root [ROOT_PATH], --root_path [ROOT_PATH]
                        Set OHOS root path
  -p, --product         Set OHOS board and kernel
If you run hb set with no argument, the default setting process starts.
You can run hb set -root dir to set the root directory of the source code.
You can run hb set -p to set the product to build.
hb env
Displays the current settings.
hb env
[OHOS INFO] root path: xxx
[OHOS INFO] board: hispark_taurus
[OHOS INFO] kernel: liteos
[OHOS INFO] product: ipcamera
[OHOS INFO] product path: xxx/vendor/hisilicon/ipcamera
[OHOS INFO] device path: xxx/device/hisilicon/hispark_taurus/sdk_linux_4.19
hb build
hb build -h
usage: hb build [-h] [-b BUILD_TYPE] [-c COMPILER] [-t [TEST [TEST ...]]] [-cpu TARGET_CPU] [--dmverity] [--tee]
                [-p PRODUCT] [-f] [-n] [-T [TARGET [TARGET ...]]] [-v] [-shs] [--patch] [--compact-mode]
                [--gn-args GN_ARGS] [--keep-ninja-going] [--build-only-gn] [--log-level LOG_LEVEL] [--fast-rebuild]
                [--device-type DEVICE_TYPE] [--build-variant BUILD_VARIANT]
                [component [component ...]]

positional arguments:
  component             name of the component, mini/small only

optional arguments:
  -h, --help            show this help message and exit
  -b BUILD_TYPE, --build_type BUILD_TYPE
                        release or debug version, mini/small only
  -c COMPILER, --compiler COMPILER
                        specify compiler, mini/small only
  -t [TEST [TEST ...]], --test [TEST [TEST ...]]
                        compile test suit
  -cpu TARGET_CPU, --target-cpu TARGET_CPU
                        select cpu
  --dmverity            enable dmverity
  --tee                 Enable tee
  -p PRODUCT, --product PRODUCT
                        build a specified product with {product_name}@{company}
  -f, --full            full code compilation
  -n, --ndk             compile ndk
  -T [TARGET [TARGET ...]], --target [TARGET [TARGET ...]]
                        compile single target
  -v, --verbose         show all command lines while building
  -shs, --sign_haps_by_server
                        sign haps by server
  --patch               apply product patch before compiling
  --compact-mode        compatible with standard build system set to false if we use build.sh as build entrance
  --gn-args GN_ARGS     specifies gn build arguments, eg: --gn-args="foo="bar" enable=true blah=7"
  --keep-ninja-going    keeps ninja going until 1000000 jobs fail
  --build-only-gn       only do gn parse, donot run ninja
  --log-level LOG_LEVEL
                        specifies the log level during compilationyou can select three levels: debug, info and error
  --fast-rebuild        it will skip prepare, preloader, gn_gen steps so we can enable it only when there is no change
                        for gn related script
  --device-type DEVICE_TYPE
                        specifies device type
  --build-variant BUILD_VARIANT
                        specifies device operating mode
If you run hb build with no argument, the previously configured code directory, product, and options are used for the build. The -f option deletes all products to be built. It is equivalent to running hb clean and hb build.
You can run hb build {component_name} to build product components separately based on the development board and kernel set for the product, for example, hb build kv_store.
You can run hb build -p ipcamera@hisilicon to skip the setting step and build the product directly.
You can run hb build in device/board/device_company to select the kernel and build an image that contains the kernel and drivers only based on the current development board and the selected kernel.
hb clean
You can run hb clean to delete all the files except args.gn and build.log in the out directory. To clear files in a specified directory, add the directory parameter to the command, for example, hb clean out/board/product. By default, the files in the out directory are cleared.
hb clean
usage: hb clean [-h] [out_path]

positional arguments:
  out_path    clean a specified path.

optional arguments:
  -h, --help  show this help message and exit
Adding a Component
To add a component, determine the subsystem to which the component belongs and the component name, and then perform the following steps:
- Add the component build script after the source code development is complete.
The following example shows the BUILD.gn script (in the applications/sample/hello_world directory) for the hello_world executable file.
   executable("hello_world") {
     include_dirs = [
       "include",
      ]
     sources = [
       "src/hello_world.c"
     ]
   }
This script can be used to build a file named hello_world that can run on OpenHarmony.
To build the preceding component separately, run hb set to select a product and run the following command to build hello_world separately.
hb build -f -T //applications/sample/hello_world
After the component functions are verified on the development board, perform steps 2 to 4 to add the component to the product.
- Add the component description.
The component description is stored in the build/lite/components directory. Add the new component to the .json file of the corresponding subsystem. The component description must contain the following fields:
- component: component name.
- description: description of the component functions.
- optional: whether the component is optional.
- dirs: source code directory of the component.
- targets: component build entry.
The following is an example of adding the hello_world component to the applications.json file.
   {
     "components": [
       {
         "component": "hello_world",
         "description": "Hello world.",
         "optional": "true",
         "dirs": [
           "applications/sample/hello_world"
         ],
         "targets": [
           "//applications/sample/hello_world"
         ]
       },
       ...
      ]
   }
- Add the component to the product.
The product configuration file config.json is located in the vendor/company/product/ directory. This file contains the product name, OpenHarmony version, device vendor, development board, kernel type, kernel version, subsystems, and components. The following example adds hello_world to the my_product.json file:
   {
       "product_name": "hello_world_test",
       "ohos_version": "OpenHarmony 1.0",
       "device_company": "hisilicon",
       "board": "hispark_taurus",
       "kernel_type": "liteos_a",
       "kernel_version": "1.0.0",
       "subsystems": [
         {
           "subsystem": "applications",
           "components": [
             { "component": "hello_world", "features":[] }
           ]
         },
         ...
       ]
   }
Build the product.
Run the hb set command in the root code directory and select the product.
Run the hb build command.
Adding a Chipset Solution
The following uses the RTL8720 development board provided by Realtek as an example. To a chipset solution, perform the following steps:
- Create a directory for the chipset solution based on the configuration rules. Run the following command in the root directory of the code:
mkdir -p device/board/realtek/rtl8720
- Create a directory for kernel adaptation and write the config.gni file of the development board. For example, to adapt the LiteOS-A kernel to the RTL8720 development board, write the device/realtek/rtl8720/liteo_a/config.gni file as follows:
   # Kernel type, e.g. "linux", "liteos_a", "liteos_m".
   kernel_type = "liteos_a"

   # Kernel version.
   kernel_version = "3.0.0"

   # Board CPU type, e.g. "cortex-a7", "riscv32".
   board_cpu = "real-m300"

   # Board arch, e.g. "armv7-a", "rv32imac".
   board_arch = ""

   # Toolchain name used for system compiling.
   # E.g. gcc-arm-none-eabi, arm-linux-harmonyeabi-gcc, ohos-clang, riscv32-unknown-elf.
   # Note: The default toolchain is "ohos-clang". It's not mandatory if you use the default toochain.
   board_toolchain = "gcc-arm-none-eabi"

   # The toolchain path installed, it's not mandatory if you have added toolchain path to your ~/.bashrc.
   board_toolchain_path =
       rebase_path("//prebuilts/gcc/linux-x86/arm/gcc-arm-none-eabi/bin",
                   root_build_dir)

   # Compiler prefix.
   board_toolchain_prefix = "gcc-arm-none-eabi-"

   # Compiler type, "gcc" or "clang".
   board_toolchain_type = "gcc"

   # Board related common compile flags.
   board_cflags = []
   board_cxx_flags = []
   board_ld_flags = []
- Write the build script. Create the BUILD.gn file in the development board directory. The target name must be the same as that of the development board. The following is an example of the device/realtek/rtl8720/BUILD.gn file for the RTL8720 development board:
   group("rtl8720") { # The build target can be shared_library, static_library, or an executable file.
     # Content
     ...
   }
- Build the chipset solution. Run the hb build command in the development board directory to start the build.
Adding a Product Solution
You can customize a product solution by flexibly assembling a chipset solution and components. The procedure is as follows:
- Create a product directory based on the configuration rules. The following uses the Wi-Fi IoT module on the RTL8720 development board as an example. Run the following command in the root directory to create a product directory:
mkdir -p vendor/my_company/wifiiot
- Assemble the product. Create a config.json file, for example for wifiiot, in the product directory. The vendor/my_company/wifiiot/config.json file is as follows:
   {
       "product_name": "wifiiot",                        # Product name
       "version": "3.0",                                 # Version of config.json. The value is 3.0.
       "type": "small",                                  # System type. The value can be mini, small, or standard.
       "ohos_version": "OpenHarmony 1.0",                # OS version
       "device_company": "realtek",                      # Name of the chipset solution vendor
       "board": "rtl8720",                               # Name of the development board
       "kernel_type": "liteos_m",                        # Kernel type
       "kernel_version": "3.0.0",                        # Kernel version
       "subsystems": [
         {
           "subsystem": "kernel",                        # Subsystem
           "components": [
             { "component": "liteos_m", "features":[] }  # Component and its features
           ]
         },
         ...
         {
            More subsystems and components
         }
       ]
   }
Before the build, the Compilation and Building subsystem checks the validity of fields in config.json. The device_company, board, kernel_type, and kernel_version fields must match the fields of the chipset solution, and subsystem and component must match the component description in the build/lite/components file.
Implement adaptation to OS APIs. Create the hals directory in the product directory and save the source code as well as the build script for OS adaptation in this directory.
Configure system services. Create the init_configs directory in the product directory and then the init.cfg file in the init_configs directory, and configure the system services to be started.
(Optional) Configure the init process for the Linux kernel. Create the etc directory in the init_configs directory, and then the init.d folder and the fstab file in the etc directory. Then, create the rcS and Sxxx files in the init.d file and edit them based on product requirements.
(Optional) Configure the file system image for the development board that supports the file system.
Create a fs.yml file in the product directory and configure it as required. A typical fs.yml file is as follows:
   -
     fs_dir_name: rootfs # Image name
     fs_dirs:
       -
         # Copy the files in the out/my_board/my_product/bin directory to the rootfs/bin directory and ignore the .bin files related to testing.
         source_dir: bin
         target_dir: bin
         ignore_files:
           - Test.bin
           - TestSuite.bin
       -
         # Copy the files in the out/my_board/my_product/libs directory to the rootfs/lib directory, ignore all .a files, and set the file permissions to 644 and folder permissions 755.
         source_dir: libs
         target_dir: lib
         ignore_files:
           - .a
         dir_mode: 755
         file_mode: 644
       -
         source_dir: usr/lib
         target_dir: usr/lib
         ignore_files:
           - .a
         dir_mode: 755
         file_mode: 644
       -
         source_dir: config
         target_dir: etc
       -
         source_dir: system
         target_dir: system
       -
         source_dir: sbin
         target_dir: sbin
       -
         source_dir: usr/bin
         target_dir: usr/bin
       -
         source_dir: usr/sbin
         target_dir: usr/sbin
       -
         # Create an empty proc directory.
         target_dir: proc
       -
         target_dir: mnt
       -
         target_dir: opt
       -
         target_dir: tmp
       -
         target_dir: var
       -
         target_dir: sys
       -
         source_dir: etc
         target_dir: etc
       -
         source_dir: vendor
         target_dir: vendor
       -
         target_dir: storage

     fs_filemode:
       -
         file_dir: lib/ld-uClibc-0.9.33.2.so
         file_mode: 555
       -
         file_dir: lib/ld-2.24.so
         file_mode: 555
       -
         file_dir: etc/init.cfg
         file_mode: 400
     fs_symlink:
       -
         # Create the soft link ld-musl-arm.so.1 -> libc.so in the rootfs/lib directory.
         source: libc.so
         link_name: ${fs_dir}/lib/ld-musl-arm.so.1
       -
         source: mksh
         link_name: ${fs_dir}/bin/sh
       -
         source: mksh
         link_name: ${fs_dir}/bin/shell
     fs_make_cmd:
       # Run the script to create an ext4 image from rootfs.
       - ${root_path}/build/lite/make_rootfs/rootfsimg_linux.sh ${fs_dir} ext4
   -
     fs_dir_name: userfs
     fs_dirs:
       -
         source_dir: storage/etc
         target_dir: etc
       -
         source_dir: data
         target_dir: data
     fs_make_cmd:
       - ${root_path}/build/lite/make_rootfs/rootfsimg_linux.sh ${fs_dir} ext4
- (Optional) Configure patches if the product and components need to be patched.
Create a patch.yml file in the product directory and configure it as required. A typical patch.yml file is as follows:
   # Directory in which the patch is to be installed
   foundation/communication/dsoftbus:
     # Directory in which the patch is stored.
     - foundation/communication/dsoftbus/1.patch
     - foundation/communication/dsoftbus/2.patch
   third_party/wpa_supplicant:
     - third_party/wpa_supplicant/1.patch
     - third_party/wpa_supplicant/2.patch
     - third_party/wpa_supplicant/3.patch
   ...
 Add **--patch** when running the **hb build** command. Then, the patch files can be added to the specified directory before the build.

```
hb build -f --patch
```
- Write the build script. Create a BUILD.gn file in the product directory and write the script. The following BUILD.gn file uses the Wi-Fi IoT module in step 1 as an example:
   group("wifiiot") { # The target name must be the same as the product name.
     deps = []
     # Copy the init configuration.
     deps += [ "init_configs" ]
     # Add **hals**.
     deps += [ "hals" ]
     # Others
     ...
   }
- Build the product. Run the hb set command in the code root directory, select the new product as prompted, and run the hb build command.
Troubleshooting
“usr/sbin/ninja: invalid option – w” Displayed During the Build Process
- Symptom
The build fails, and usr/sbin/ninja: invalid option – w is displayed.
- Possible Causes
The Ninja version in use does not support the –w option.
- Solution
Uninstall Ninja and GN, and install Ninja and GN of the required version.
”/usr/bin/ld: cannot find -lncurses” Displayed During the Build Process
- Symptom
The build fails, and /usr/bin/ld: cannot find -lncurses is displayed.
- Possible Causes
The ncurses library is not installed.
- Solution
sudo apt-get install lib32ncurses5-dev
“line 77: mcopy: command not found” Displayed During the Build Process
- Symptom
The build fails, and line 77: mcopy: command not found is displayed.
- Possible Causes
mcopy is not installed.
- Solution
sudo apt-get install dosfstools mtools
“riscv32-unknown-elf-gcc: error trying to exec ‘cc1’: execvp: No such file or directory” Displayed During the Build Process
- Symptom
The build fails, and the following information is displayed:
riscv32-unknown-elf-gcc: error trying to exec ‘cc1’: execvp: No such file or directory
- Possible Causes
Permission is required to access files in the RISC-V compiler directory.
Solution
- Run the following command to locate gcc_riscv32:
which riscv32-unknown-elf-gcc
- Run the chmod command to change the directory permission to 755.
“No module named ‘Crypto’” Displayed During the Build Process
- Symptom
The build fails, and No module named ‘Crypto’ is displayed.
- Possible Causes
Crypto is not installed in Python 3.
Solution
- Run the following command to query the Python version:
python3 --version- Ensure that Python 3.9.2 or later is installed, and then run the following command to install PyCryptodome:
sudo pip3 install pycryptodome
“xx.sh : xx unexpected operator” Displayed During the Build Process
- Symptom
The build fails, and xx.sh [: xx unexpected operator is displayed.
- Possible Causes
The build environment shell is not bash.
- Solution
  sudo rm -rf /bin/sh
  sudo ln -s /bin/bash /bin/sh
你可能感兴趣的文章
- 所属分类: 后端技术
- 本文标签: